REFRESH THIS PAGE
I am currently updating these pages and might have made minor changes since you last viewed it in your browser.
How to Publish your Web Site
What is Publishing?
Publishing a web site means uploading it to a web server and making it available to the public. To publish a web site, you need:
- A web site to publish (all of the files that make up your site, organized into directories).
- A web server or space on someone else's web server.
- An FTP client that allows you to connect to the web server so you can upload your files.
1. A Web Site
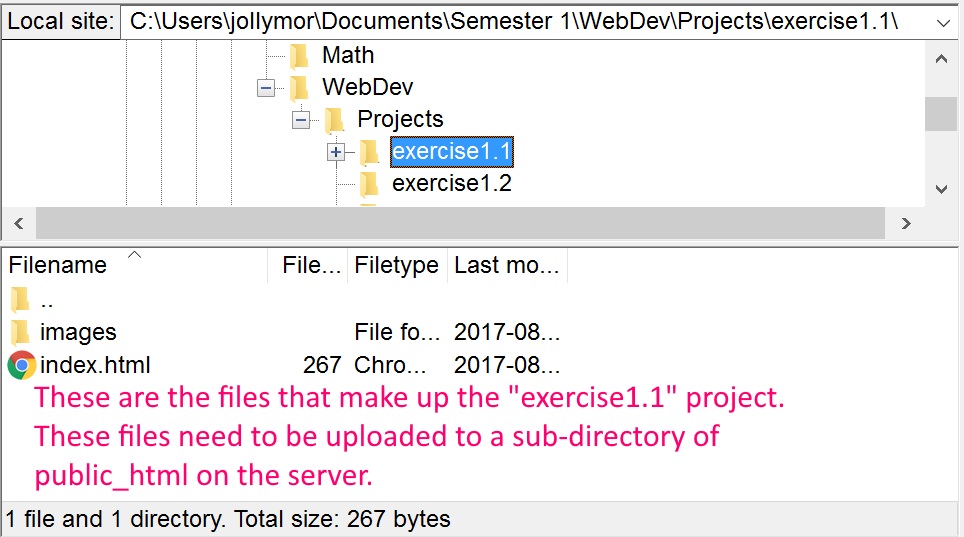
Your web site consists of the index.html file, plus all the other HTML files, CSS files, images, etc. in their various directories. All of these files need to be published so that your web site is visible and usable by the public.
Each of your web projects is stored in its own directory. For example, exercise 1.2 could be stored in the /exercise1_2 directory, and assignment 1 could be stored in the /assign1 directory.
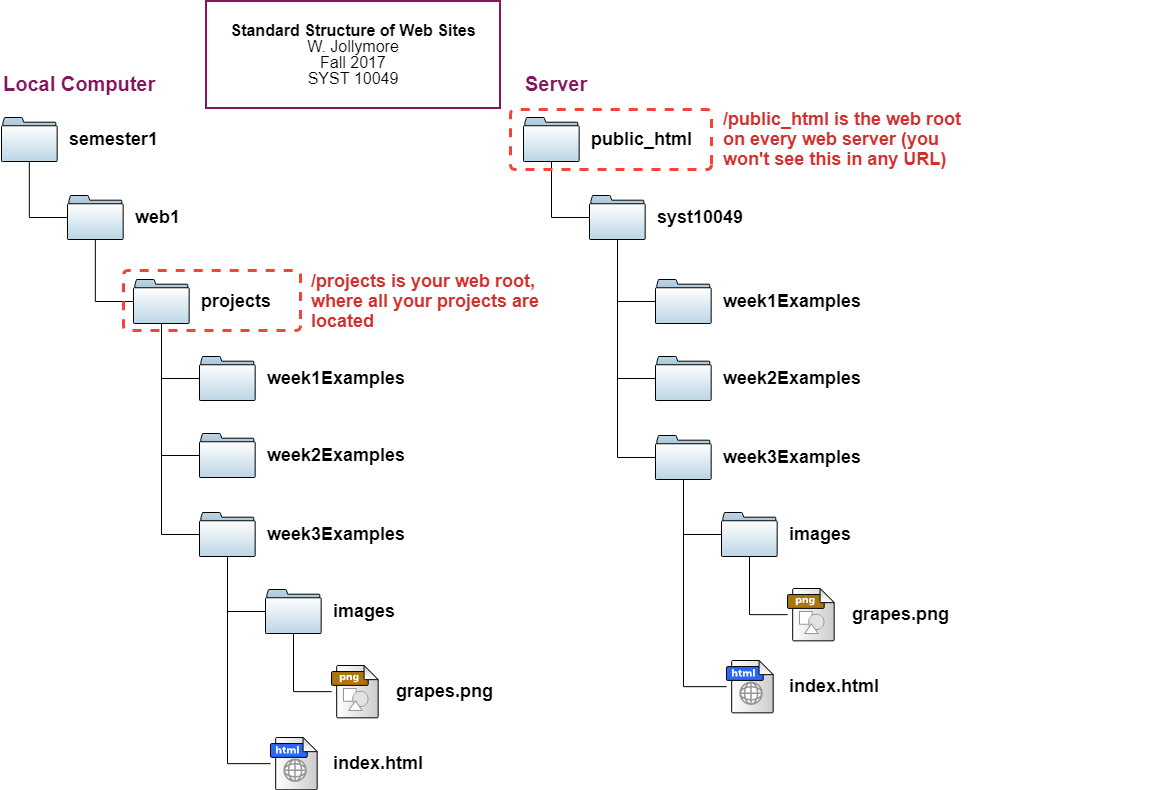
The main directory that contains all of your project's files is called the site root or project root. All of your site's other files and directories should be off the project root.
When you're creating any kind of application, that application is usually stored in it's own directory (folder, same thing; in tech we say directory). For example, I might have created an application that allows people to view and rate my cats' pictures, so all the files I wrote to make that application might go in a directory called /WendiCats (we like to put the / in front of the directory name so it's easy to tell that it's a directory name, not a file name). So /WendiCats is the root of my application.
A typical web site's physical file structure includes:
- index.html: this is the main file of your web site. It goes in your project root directory. When a user browses to your web site, they'll see this file in their browser if they don't include a file name in the URL. For example, browsing to sheridancollege.ca will actually load sheridancollege.ca/index.html.
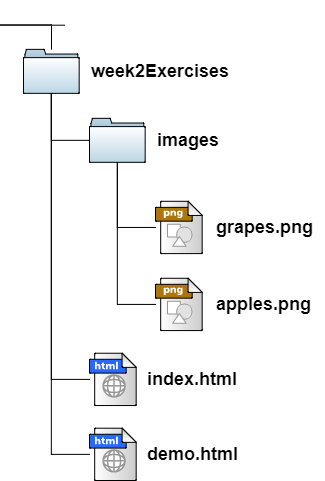
- /images directory: the /images directory off the web root contains all the images for your web site. If you have a lot of images, you might have sub-directories inside the /images directory (e.g. if you run a movie review site, you could have /images/movies, /images/userpics, /images/ratingpics, etc.
- /css directory: the /css directory contains all of the .css files for your web site. Some developers call it /styles instead, and that's fine.
- Other sub-directories and files: your site will likely contain other files and directories. For example, many developers have a /content directory that contains all of the other HTML files in the project. In term 2, you'll add a /scripts directory for your JavaScript files. If your site is large, you might have sub-directories to organize content. For example, a movie review site might have /reviews, /movieinfo, and /files.
Before you publish, you must make sure you have the standard directory and file structure on your computer for your web project.
There is also a "root" directory on every computer's hard drive (physical drive or virtual drive, they all have a root directory). On your laptop, it's the main area from which all the other directories and sub-directories spawn or branch off. Think of a computer's root directory like the lobby of a hotel. All the areas, floors, and rooms branch off from the lobby - you can follow a path to any room you want if you start at the lobby. Same with your computer: starting at the root of your C: drive (we call it C:/ because / all by itself means "the root of this drive") you can reach any room by going through various hallways and elevators. Some people also think of it like a filing cabinet: A single cabinet represents a drive (e.g. the C: drive). Each drawer represents a directory that branches off the C: drive's root directory. Inside a drawer, you would have several file-folders: each folder represents a sub-directory off the drawer-directory (in fact, this is why people started calling directories "folders", because they were taught using the filing cabinet analogy!) File folders can contain other folders (sub-directories can contain their own sub-directories). Eventually, you'll get to some folders with actual papers inside them (papers = files). On a computer, any directory can contain files. Some directories contain both files and sub-directories. This is why it's so easy to forget where you put your files and end up with a mess of different versions of the same file :P
2. A Web Server
The web server is the computer that hosts your web site. It stores your entire set of web site files so that the public can view/use your site.
In this course, you're given space on the Sheridan FAST development server (dev.fast.sheridanc.on.ca). The dev.fast server is a web server that runs Apache Web Server software. Apache is one of the most popular web server programs used on the WWW today. Web server software handles client requests and sends back the appropriate responses. Without software like Apache, the server would not know how to accept requests and what to do with those requests.
The dev.fast server also includes a software program called cPanel. cPanel provides an easy way for you to manage your own web space via an intuitive graphical user interface. Without cPanel, you would have to manage your web space by interacting directly with Apache and Linux.
The physical file/directory structure of your project on the web server should exactly mirror the structure of your project on your computer. This makes it easier for you to upload your site's files and find the files you want to edit or move when you make updates.
As previously mentioned, each project has its own project root (where all that project's files and sub-directories are stored). We also have a web root, which is the main directory where all our project directories are located. For example, you created a directory called "syst10049" or "syst10199" for this course. Then you added a sub-directory called "assignments". In the /assignments directory, you would put all of your assignment project-directories, such as /assign1, /assign2, /assign3, etc. /assign1 is the project root for your Assignment 1 project, /assign2 is the project root for your Assignment 2 project. /assignments is the root or project root for all of your assignment projects.
On a web server, there's always a directory called /public_html. This is the web root on the server: it contains all the public files and directories for all pages/applications on that server. In other words, any file that a user can access directly with a URL is stored in the /public_html directory. You do not access the /public_html directory in your browser (ie. you never access it via url like login.dev.fast.sheridanc.on.ca/public_html). This is just a location for storing any files that are publicly accessible. In term 2, you'll create web sites that contain files that can't be accessed publicly via direct URL, and you will NOT store those inside /public_html. For syst10049, all your web site files should be publicly available, so they will be somewhere inside /public_html.
On the development server, you have your very own /public_html to use as the root for all of your web content - not just for this course, but for the web programming course next semester, too! This is why you created a sub-directory off the /public_html root for this course (e.g. /syst10049 or /syst10199) and put all of your web projects inside /public_html/syst10049 or /public_html/syst10199. When you learn Node.js, you'll actually use a directory outside of /public_html because your Node.js code should never be public (it will not be accessible via a URL).
The server should have a directory called
/public_html. This is the web root
on the server, and it is where your web sites should go. The /public_html directory is where all the publicly accessible
web content on a server goes - every web server has a /public_html directory
(or sometimes it's called /www instead).
Each student in this course has their own account on dev.fast.sheridanc.on.ca, so you will have your own individual /public_html directory on the server. That is were all of your web sites will go (except when you do Node.js in term 2, but that will be discussed in the Node.js lessons).
You'll be using this web space for several
courses, therefore will be required to store your projects inside
a directory that corresponds to your course code, e.g.
/syst10049 or /syst10199.
Server directory and file names are case-sensitive. This means that the file "index.html" is not the same as "Index.html", and the directory "/syst10049" is not the same as "/SYST10049". When you're given instructions regarding the names of files and directories, make sure you type those names EXACTLY as shown. If your case doesn't match, a URL won't work. On an assignment, this would cause you to receive a penalty or even a 0-grade on the assignment.
3. An FTP Client
When you installed your software, you installed an FTP client (the examples all used FileZilla, but you might have installed a different client, which is fine). You use an FTP client to upload (and download, if necessary) your files to the web server. This is where the actual publishing process occurs! Uploading your files to the server publishes your web site. Note that all files that make up your web site must be uploaded to the server. If you have some images on an HTML page, you must upload both the HTML page and all the image files. If you make changes to any file (e.g. if you edit the HTML page's code) then you must re-upload the edited file, or else the changes are only on your own computer and not on the server.
You technically don't NEED an FTP Client (e.g. FileZilla) because cPanel contains a file manger that you can use. However, the cPanel file manager can be a bit slow and cumbersome, especially when it comes to uploading your files and directories. Using a tool like FileZilla instead is much faster: you can easily upload a file or an entire project directory by simply dragging it from the file system on your computer to the server's file system.
How to Publish a Project
Where Do I Publish?
Your professor might require a slightly different directory structure. Pay attention to the specific instructions given to you by your professor. If you're not sure, ask!!
Make sure as you follow the instructions on this page that you are using the directory structure required by your professor.
When connected to the server, most FTP clients will show you the files and directories on your local machine, and the files and directories on the server (the remote machine). In FileZilla, the left side is the local machine and the right side is the remote server, which is pretty standard. If a client uses top and bottom, then the top is usually local and the bottom is remote.
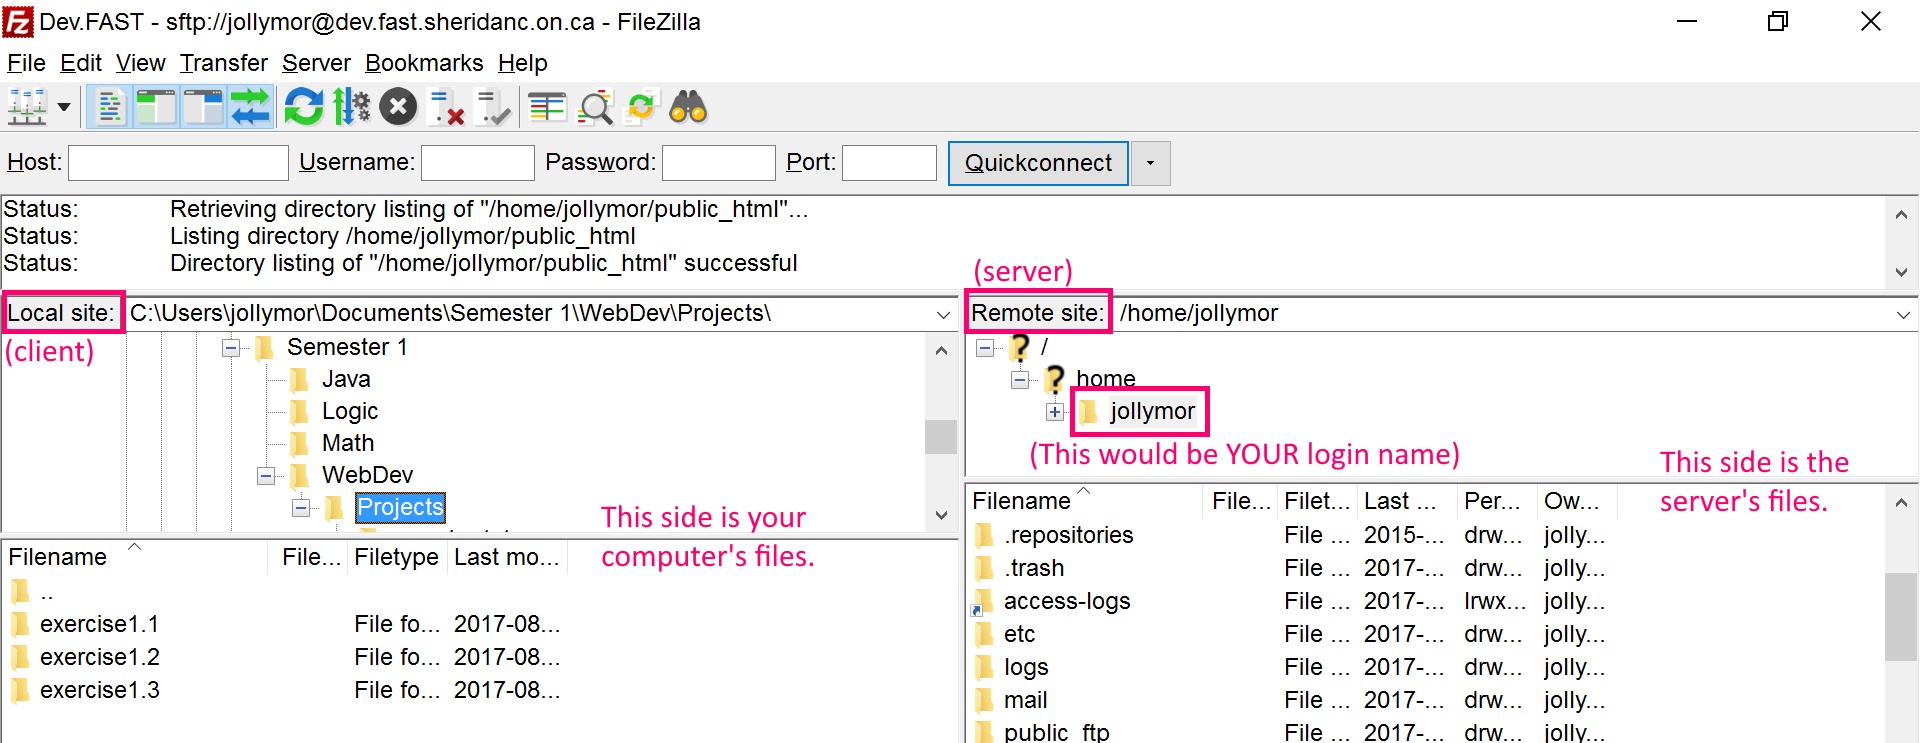
the remote server (FAST Development server, on the right)
On the FAST development server, you saw that your home directory had a name and location such as /home/login (where "login" was your sheridan username/login name). Inside that directory was your /public_html directory, which is your web root for all of your web projects and applications. When you upload your files, always make sure you're uploading your files somewhere inside /your home directory/public_html/syst10049 pr /your home directory/public_html/syst10199 or whatever is appropriate: either right in the course code directory or one of its sub-directories.
Your professor might require a slightly different directory structure. Pay attention to the specific instructions given to you by your professor. If you're not sure, ask!!
Make sure as you follow the instructions on this page that you are using the directory structure required by your professor.
On the remote side, click on the directory that is the same as your login name, or expand it if it's expandable: do whatever is appropriate in your FTP client to open the directory and see its contents.
If it's easier, you can tell FileZilla that whenever you connect to the development server, you want to always be in a certain local directory and/or remote directory. Just edit the connection's settings using the Connection Manager, go to the Advanced tab, and set the "Default local directory" to whatever you want on your own computer, and then set the "Default remote directory" to /homeDirectoryLocation/public_html where "homeDirectoryLocation" is your home directory (e.g. "/home/foobar" if your login name is "foobar").
You will see several different files and directories when you connect to the development server that may or may not match every screen shot in these lecture notes, but you'll definitely see a lot of directories and files beyond what we've already talked about. This is normal: on the development server, each user has been assigned an area that simulates a web server, so you'll have your own copies of all the standard files and directories that you commonly see on a web server.
The FAST development server is running the Apache Http Server Software. Apache is the most popular HTTP server software used on the Internet. It's Open Source and free! A lot of web servers run Apache.
Your professor might require a slightly different directory structure. Pay attention to the specific instructions given to you by your professor. If you're not sure, ask!!
Make sure as you follow the instructions on this page that you are using the directory structure required by your professor.
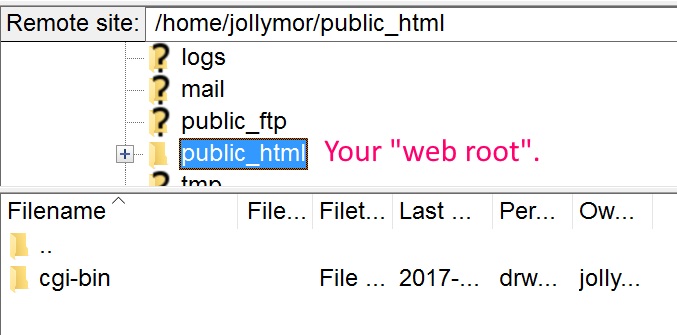
On the remote server, locate and open the public_html directory in your login folder. This is your web root, or the main directory of your area of the web server where all your public web content will go. When you browse to http://login.dev.fast.sheridanc.on.ca (where "login" is your own login), the server will send the browser either a directory listing of the public_html web root directory contents, or any valid index file (e.g. index.html, index.php) inside the public_html web root directory.
Try it now: go to your preferred browser and type http://login.dev.fast.sheridanc.on.ca (replace "login" with your own login name) into the address bar. If there is an index file in your public_html directory on the server, you'll see that. If not, you'll see a hypertext list of any sub-directories inside public_html.
What Do I Publish?
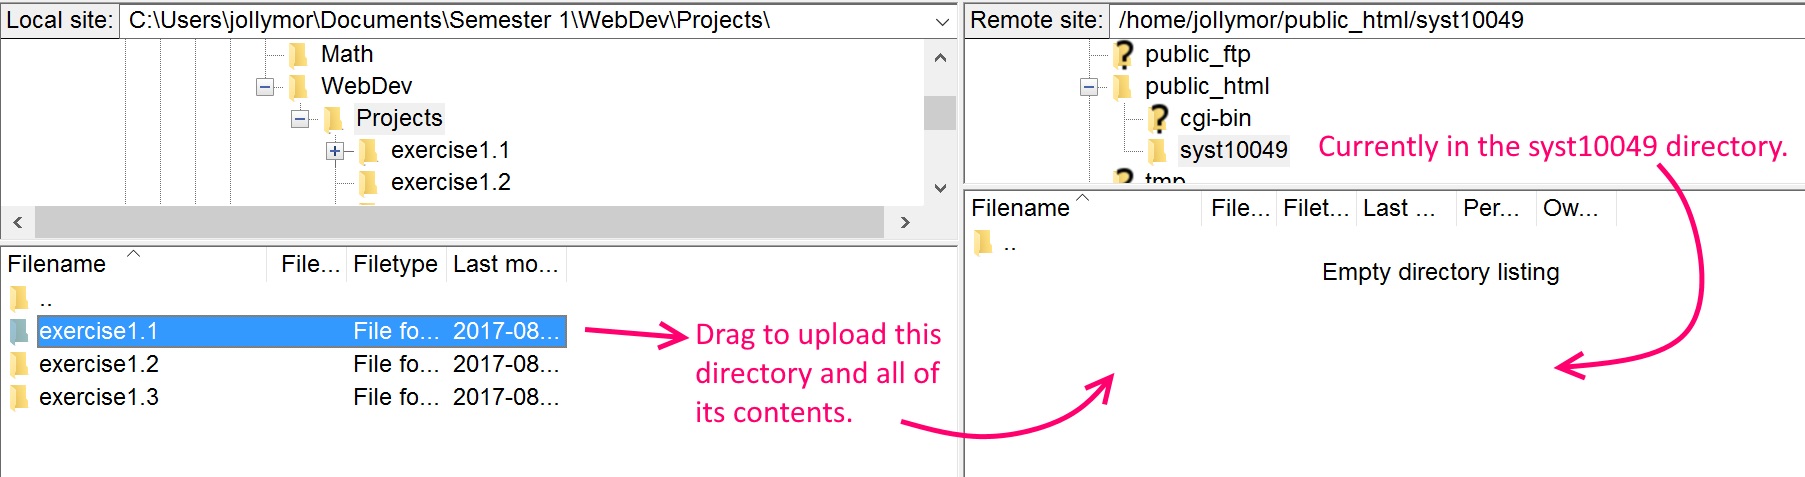
To upload files, you need to find the files on your local machine. In your FTP client, the local files are usually listed on the left. For example, use the local window in FileZilla to browse to that directory on your computer. You can then upload any files that make up your web site into a project directory in your web space on the server. Or you can even upload an entire directory from the local machine to the server.
of the public_html directory on the server.
Before you upload your files, you'll want to create some directories on the server side.
Adding Remote Directories
Your professor might require a slightly different directory structure. Pay attention to the specific instructions given to you by your professor. If you're not sure, ask!!
Make sure as you follow the instructions on this page that you are using the directory structure required by your professor.
Before you upload, you will need to create some directories. At the very least, you should create a directory for this course called "syst10049" and then create some sub-directories inside it where you will keep your applications (e.g. assign1, assign2, etc).
- On the remote server, right-click the public_html
directory or go into the public_html directory
and right-click in the space where the files are listed.
A context menu should appear, and it
should contain an item that allows you to add a new
directory. If not, check the FTP client's main menu
options for an Add Directory/Folder option.
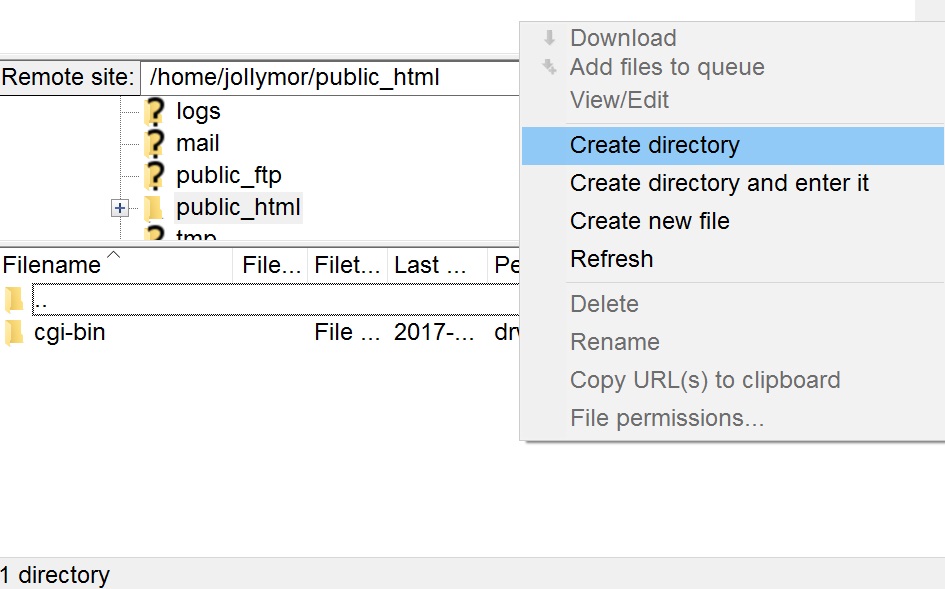
Creating a new directory inside public_html - Enter the name of your new directory. Then click OK.

Enter the new directory name. - Continue this process to add whatever directories you need on the remote server.
Your professor might require a slightly different directory structure. Pay attention to the specific instructions given to you by your professor. If you're not sure, ask!!
Make sure as you follow the instructions on this page that you are using the directory structure required by your professor.
Uploading Files
Now that you know what files to upload and where to upload them (to the appropriate directories inside your server's public_html directory that resides in your login directory), it's time to do it!
Uploading is simple: most current FTP clients allow you to drag files and folders from your local machine to the remote directories. If drag-and-drop doesn't work, try double-clicking the files/folders on your local machine. If that doesn't work, look at the UI of your client and see if there's a button (e.g. WS FTP has arrow buttons pointing from the local file/folder list to the remote file/folder list).
When I want to upload a whole project, I like to just drag the project directory from my computer to the server directory where I want it to be. For example, if I want to upload the "exercise1.1" project to the server off the "syst10049" directory, I'll go into the syst10049 directory on the server and then drag the "exercise1.1" directory from the client side to the server side.
Your professor might require a slightly different directory structure. Pay attention to the specific instructions given to you by your professor. If you're not sure, ask!!
Make sure as you follow the instructions on this page that you are using the directory structure required by your professor.
local machine to the server.
After uploading, you should see a copy of your project's public_html folder in the appropriate directories on the server!

Once you have successfully published your web site, you can view it in any browser. Using the FAST development server, you would use the URL http://login.dev.fast.sheridanc.on.ca where "login" is your own Sheridan user name. See the next section for more details.
Every time you make changes to your code, or if you add/edit other files in your project, you'll have to re-upload your files so the new versions go onto the server. If you delete a file from your project, you have to go to the server and delete it there too.
This sounds a bit cumbersome, but it's actually quite normal. There are some fancier web editors that deal with all this for you, but they're usually expensive :P
How to View Your Projects/Pages
So now that you can publish web pages and applications, how do you
view them? As you noticed when you set up your web space, you have your
own domain for your work: login.dev.fast.sheridanc.on.ca
("login" is your Sheridan user name).
Typing that address into a browser will automatically go to your
/public_html directory. So let's say you did the first homework exercise
for syst10049 week 1 and put it inside your /public_html/syst10049 directory,
inside it's own project root directory called /Week1Ex1. Let's also
say you called your html page exercise1.html. Your URL to this page
would be:
login.dev.fast.sheridanc.on.ca/syst10049/Week1Ex1/exercise1.html
Your URL might be preceded by http:// or https:// -- do whichever works.
If you get tired of always typing login.dev.fast.sheridanc.on.ca/syst10049/ in front of each project name you create, you can always go to that address in your browser and bookmark it. Then you can just use the bookmark and edit the URL to add the project name and file name whenever you want to test a new project.