REFRESH THIS PAGE
I am currently updating these pages and might have made minor changes since you last viewed it in your browser.
Week 6: Lists and Tables
In this lesson you'll learn how to create both numbered and bulleted lists, and how to create accessible HTML tables. Lists are used for many things: step-by-step instructions, lists of items or people, and even for some kinds of menu structures. HTML tables are used to display tabular data in rows and columns.
HTML Lists
Notes
Resources
- References:
- MDN: <ul> element, <ol> element, and <li> element.
- Tools:
- HTML Validator - always validate all of your HTML.
- Lorum Ipsum Text Generator - there are other ones, I like this one. Feel free to use a different one. Generates filler text for web pages.
- Tutorials and Articles:
HTML Tables
Notes
Resources
- References:
- MDN: <table> element, <caption> element, <tr> element, <th> element, and <td> element
- Tools:
- HTML Validator - always validate all of your HTML.
- Lorum Ipsum Text Generator - there are other ones, I like this one. Feel free to use a different one. Generates filler text for web pages.
- Tutorials and Articles:
- MDN Tables Guide - there are a few sections to progress though, including a self-assessment at the end.
- WAI: Tables with Multi-level Headers
Homework
Practice/Study Questions
- Answer the following questions where you take your
class notes (form your answers using YOUR OWN WORDS; you might have
to search for answers in the resources above):
- What might you use an unordered list for? What about an ordered list? What elements make up an unordered list and an ordered list? How do you change the numbering style of an ordered list?
- How do you properly nest lists?
- What elements do you need to create HTML tables? What's the difference between <th> and <td>?
- What are the
colspanandrowspanattributes for, and where do you use them? - What is the
scopeattribute for and what are the possible values it can accept?
Practice Exercises
In the practice exercises, elements are referred to in all-caps, e.g. FOOTER refers to the <footer></footer> element (or it could also refer to an opening <footer> tag or closing </footer> tag, you will know by the context in which it's used).
For each exercise, validate the HTML using the HTML Validator. Fix all problems until you get no errors.
If you would like to make your pages "pretty", I have created a very basic stylesheet you can use (and feel free to edit, if you're feeling adventurous or already know some CSS):
- In your /syst10049 directory, add a sub-directory called /css
- Download the main.css file by right-clicking the link and selecting "Save As..." in the context menu. Save the main.css file to your /syst10049/css directory.
- In any .html file where you want to add the styles, add
the following code inside the document's <head></head>
element:
<link rel="stylesheet" href="../../css/main.css">
This assumes that you're following the file/directory structure described in each week's exercises and using industry best practices. (e.g. if your .html is in /week1/exercise1, then ../../ goes back up to the syst10049 directory, then /css/main.css references the main.css file inside the /css directory inside /syst10049)
- If you haven't already done so, create a sub-directory in your
local workspace and in your server workspace (off /syst10049)
called "week1". Feel free to add an extra level for all
of your practice exercises (e.g. /exercises).
- For each practice exercise in each lesson, you'll usually be asked to create an exercise directory for that project, such as "/exercise1".
- It is assumed that you will create the exercise project directory in both your local workspace and in your server workspace using the appropriate and standard directory structure discussed in class.
- Add an index.html page to your week 5 directory. Add the minimal HTML and set the title to something that makes sense. Then add the code to create an unordered list that contains links to all the other exercises in this lesson.
- Create a new project directory called /exercise1 in this week's
directory.
Add an index.html page to your exercise1 directory. Add the
minimal HTML and set the title to something that makes sense.
Then add the code to create
the following nested list:
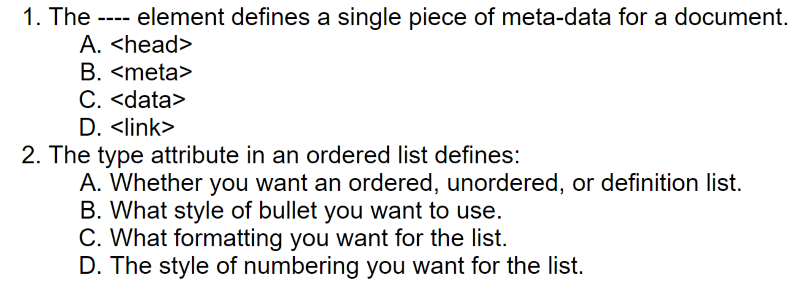
There are 2 multiple-choice questions displayed. Question 1 has the text "The ---- element defines a single piece of meta-data for a document." and has four possible answered labeled A, B, C, and D. They are "<head>", "<meta>", "<data>", and "<link>". The second question has the text "The type attribute in an ordered list defines:". Question 2 also has four options labeled A, B, C, and D. They are "Whether you want an ordered, unordered, or definition list.", "What style of bullet you want to use.", "What formatting you want for the list.", and "The style of numbering you want for the list."
- Create a new project directory called /exercise2 in this week's
directory.
Add an index.html page to your exercise2 directory. Add the
minimal HTML and set the title to something that makes sense.
Add a nested list to the index page:
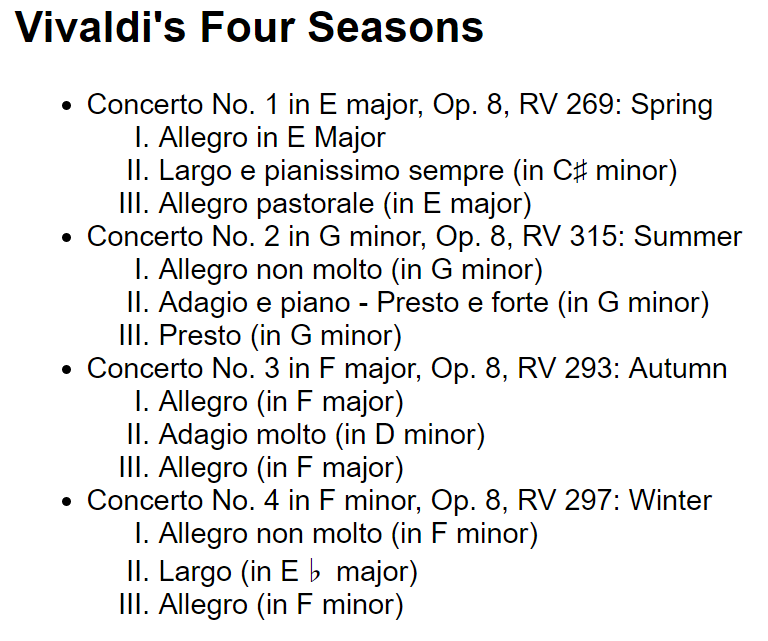
This picture shows a nested list of the various violin concertos in Vivaldi's four seasons. You can find the text at Wikipedia. The outer list is an unordered list where each list item is one concerto (Spring, Summer, Autumn, Winter); inside each list item is an ordered list of the 3 movements for that concerto, using upper-case roman numerals.
- Create a new project directory called /exercise3 in this week's
directory.
Add an index.html page to your exercise3 directory. Add the
minimal HTML and set the title to something that makes sense.
Add the following table to your index page between the header
and footer:
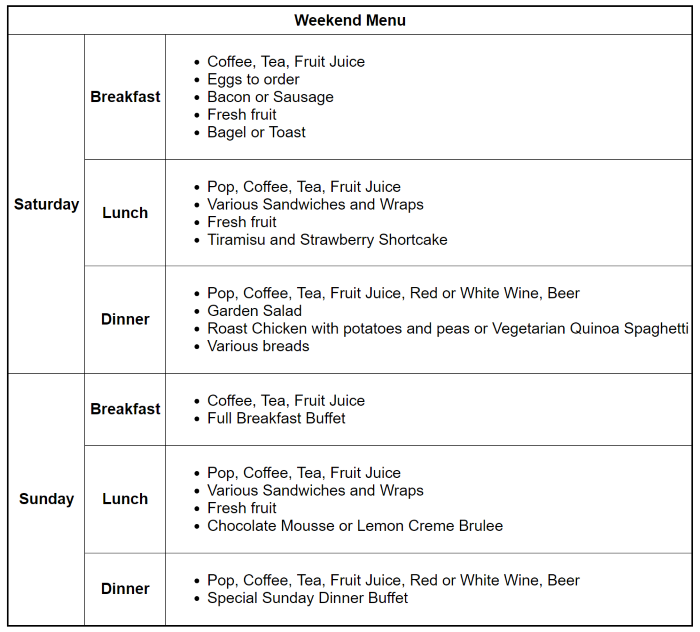
This picture shows a large table with a weekend menu. There's a header across the top of the table that says "Weekend Menu". Along the left side of the table are 2 cells vertical to each other: One containing "Saturday" and the other containing "Sunday". To the right of the Saturday cell is another 3 cells stacked vertically containing "Breakfast", "Lunch", and "Dinner". These three vertical cells are repeated to the right of the Sunday cell, also. To the right of the top-most Breakfast cell is a bullet list of food items: "Coffee, Tea, Fruit Juice", "Eggs to order", "Bacon or Sausage", "Fresh fruit", and "Bagel or Toast". To the right of the top-most Lunch cell is a bullet list of food items: "Pop, Coffee, Tea, Fruit Juice", "Various Sandwiches and Wraps", "Fresh fruit", and "Tiramisu and Strawberry Shortcake". To the right of the top-most Dinner cell is a bullet list of food items: "Pop, Coffee, Tea, Fruit Juice, Red or White Wine, Beer", "Garden Salad", "Roast Chicken with potatoes and peas or Vegetarian Quinoa Spaghetti", and "Various breads". To the right of the bottom three Breakfast, Lunch, and Dinner cells are three similar cells to the ones described above, containing various food items. Feel free to use the same text or type in your own food items.
- Create a new project directory called /exercise3 in this week's
directory.
Add an index.html page to your exercise3 directory. Add the
minimal HTML and set the title to something that makes sense.
Add the code to create the following table:
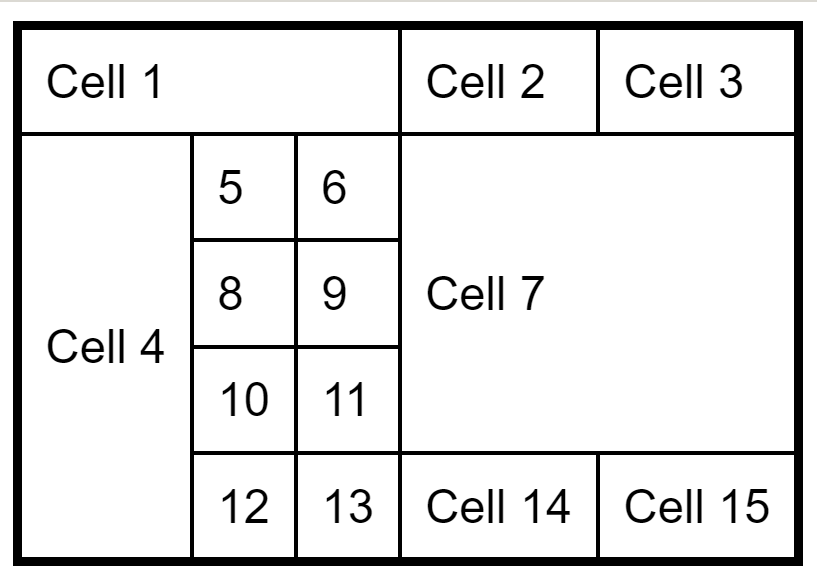
This picture shows a generic table with several rows and columns. The table is structured as: Row 1: Three cells, the first contains "Cell 1", the second contains "Cell 2" and the third contains "Cell 3". Row 2: A tall cell that contains "Cell 4". To the right of Cell 4 is a set of 8 cells - 2 cells wide, 4 cells high. Each cell contains a number. They are, from left to right and top to bottom: 5, 6, 8, 9, 10, 11, 12, and 13. All of these cells - Cell 4 and the numbered cells, are under Cell 1. Beside the group of 8 numbered cells is a larger cell that contains "Cell 7". Cell 7 is underneath Cell 2 and Cell 3. To the left of Cell 7 are the cells with the numbers 6, 9, and 11. Under Cell 7 (and to the right of the cell containing the number 13), are 2 more cells side-by-side. Those 2 cells contain "Cell 14" and "Cell 15". Cell 14 lines up perfectly with Cell 2 and Cell 15 lines up perfectly with Cell 3 (Cell 7 sandwiched between the two groups of cells). It's helpful to use some kind of tactile tool to lay out each cell, or you can simply use popsicle sticks or toothpicks (I stick them to the table with sticky putty to keep them from moving).