I am currently updating these pages and might have made
minor changes since you last viewed it in your
browser.
SYST10049/SYST10199 Setup Tasks: Protect Assignments with .htaccess/.htpasswd
Important! Your Sheridan login name is the 8-character name
at the start of your email e.g.in login@sheridancollege.ca, login
is your Sheridan login name. Note your email address!
The value "login@shernet.sheridancollege.ca" is NOT an email address - it's a UPN
(User Principle
Name).
When asked to enter or use your Sheridan username or login name, use only
the login portion of your email or UPN.
You will need to password-protect your assignments so that others
can't copy them (remember, if someone copies your work and
gets caught with an academic integrity breach, you will
also be penalized for making your work available to them).
Note When you submit assignments, you will be required to give me
the password you set up for your assignments directory. DO NOT use your Sheridan
password. DO NOT give this password to anyone else. Feel free to change
the password often, but make sure you submit your password to me when you
submit each assignment.
Important! If you are in term 2 and taking syst10199 (Web Programming)
and have already taken syst10049 (Web Development) in term 1, then
replace all occurrences of "syst10049" with "syst10199" in the
instructions below.
Download the htaccessSetup.zip file from
SLATE (it will likely be in the content along with
the link to this lesson)
Unzip the file into its own directory in the
directory you created for this course on
your computer. As long as you followed the
earlier instructions to install a zip/compression utility,
you can probably just right-click the file and select an option
to unzip the file to it's own folder/directory on your computer.
Open the .htaccess file
in Notepad, Wordpad, or other plain text editor (you
could also open it in VS Code if you want, but DON'T use a
word processor unless you know how to make sure it saves as
plain text).
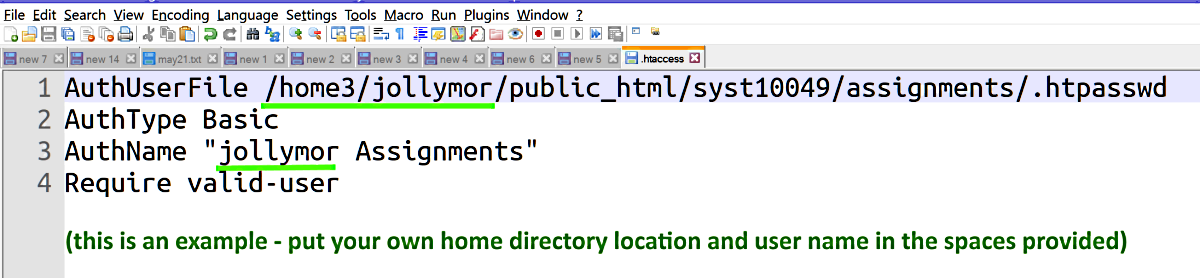
Find the text YOUR HOME DIRECTORY
and replace that with the location of your dev.fast
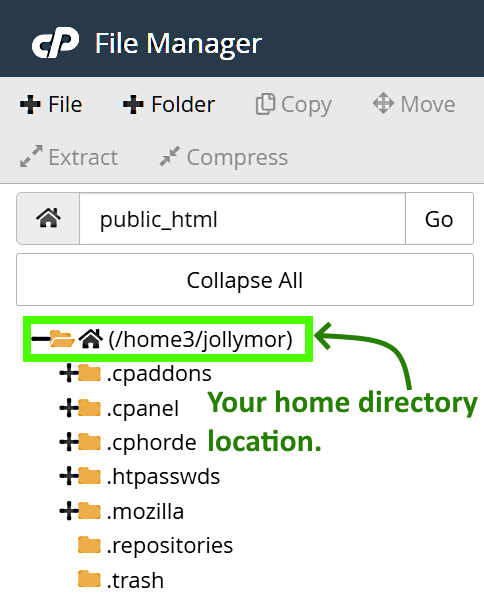
web root (public_html) directory: You can find this on the cPanel
files page at the top of the list of directories on the
left side, next to the little house icon.
Make sure you include the forward slash at the start e.g.
"/home2/foobar"
Locate the name of your home directory.
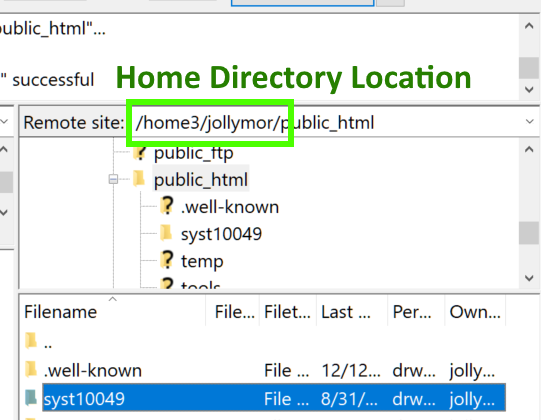
You can also find it in FileZilla on the remote server side beside
the "Remote Site:" field above the listing of directories.
Locate the name of your home directory.
Find the text YOUR USER NAME HERE and
replace it with your user name e.g. "foobar Assignments"
Save the file.
Example of .htaccess file.
Now open .htpasswd in Notepad, Wordpad, or other plain text editor (you
could also open it in VS Code if you want).
Go to Htpassword
Generator and enter your username and a password for your assignments directory
(something you won't forget because you'll have to give me this password when
I grade your assignments - therefore, DO NOT use your cPanel or Sheridan
password). All the other defaults are fine. Then click the
"Create .htpasswd file" button.
Above the user name field, copy the text that appears there (it will include
your user name, so it should be easy to find).
Paste the text into the .htpasswd file on your computer.
Save the .htpasswd file.
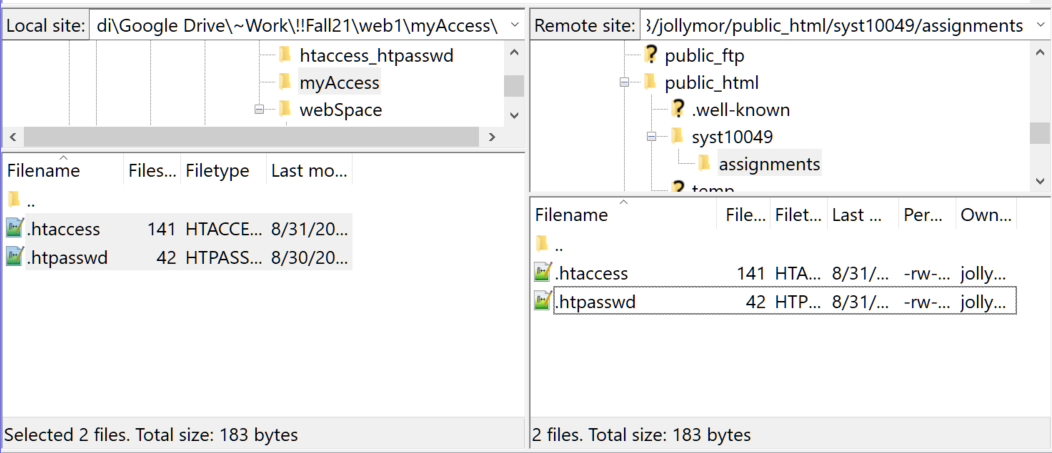
You can now close both files. Next, you will upload them to
your syst10049/assignments directory.
Now go back to cPanel or FileZilla and upload your .htaccess and .htpasswd
files into your syst10049/assignments directory:
If you're not already there, navigate to your public_html/syst10049/assignments
directory on the remote server side.
On the local computer side, navigate to the location where your
.htaccess and .htpasswd files are located.
Drag-and-drop both .htaccess and .htpasswd files from the local
computer side into the /assignments directory on the server side.
If you already have copies of these files in the /assignments
directory, you will probably be asked if you want to overwrite
the existing files on the server: The Overwrite option should already be
selected, so just click OK.
You should now see .htaccess and .htpasswd in the /assignments
directory.
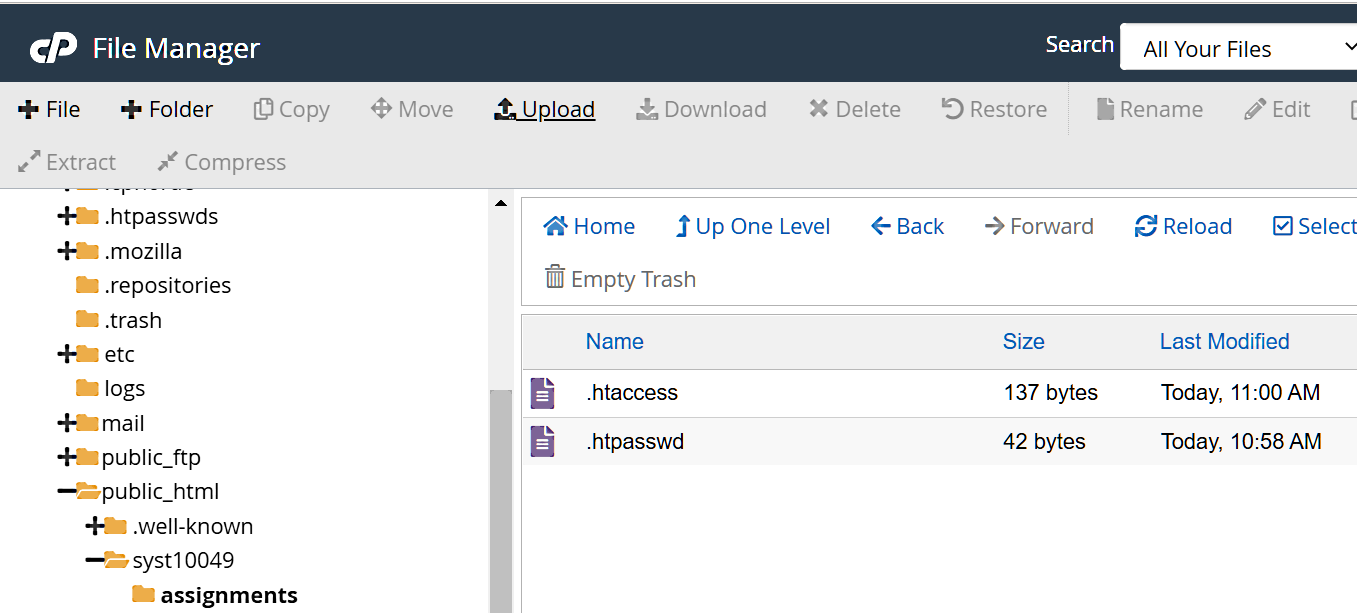
You should see both files in the public_html/syst10049/assignments directory
Note If it's easier, you can tell FileZilla that whenever you connect to the development
server, you want to always be in a certain local directory and you always want to
be in the public_html/syst10049 directory. Just edit the connection's settings using
the Connection Manager, go to the Advanced tab, and set the "Default local directory"
to whatever you want on your own computer, and then set the "Default remote directory"
to /homeDirectoryLocation/public_html where "homeDirectoryLocation" is your home
directory (e.g. "/home2/foobar" if your login name is "foobar").
If you're not already there, navigate to your public_html/syst10049/assignments
directory.
Along the top of the screen, click the Upload
button. This will open up a new tab or window.
Drag-and-drop both .htaccess and .htpasswd files into the area
specified or use the file browser to select them.
If you already have copies of these files in the /assignments
directory, check the box to "Overwrite existing files" or click
the YES button if you are prompted overwrite the files.
Once the files have uploaded, you can close that browser
tab/window, or you can also click the "Go back..." link at the
very bottom of the page.
As long as you followed the earlier instructions to show hidden
files, you should now see .htaccess and .htpasswd in the /assignments
directory.
You should see both files in the public_html/syst10049/assignments directory
Important! Only place the .htaccess and .htpasswd files in the public_html/syst10049/assignments
directory. Don't put them anywhere else.
Note If you ever want to change the password, you can repeat the appropriate steps above
and just edit your .htpasswd file and re-upload it, or you can use the cPanel
tool called "Directory Privacy" in the Files category (just follow the on-screen
instructions).