REFRESH THIS PAGE
I am currently updating these pages and might have made minor changes since you last viewed it in your browser.
SYST10049 Setup Tasks
In order to do the homework, assignments, and exercises for this course, you will need to set up your work environment. This involves:
- Understanding Basic Terms & Concepts
- Installing Software
- Setting Up Your Workspace
- Setting Up Your Web Space
- Password Protect Assignments
Basic Terms and Concepts
It's important that you understand these basic terms and concepts before you proceed. Make sure you are familiar with each one so you can accurately trouble-shoot any issues you might have.
Your Sheridan login name is the 8-character name at the start of your email e.g.in login@sheridancollege.ca,
login
is your Sheridan login name. Note your email address!
The value "login@shernet.sheridancollege.ca" is NOT an email address - it's a UPN
(User Principle
Name).
When asked to enter or use your Sheridan username or login name, use only
the login portion of your email or UPN.
Installing Software
In this course, you will need a compression/extraction tool so you can submit assignments and receive files from your professor, an editor that allows you to create and edit source code for web pages, and an FTP client to publish files to a web server.
Compression/Extraction Tool
A compression/extraction tool allows you to compress several files into one file that usually has a .zip extension (usually just called a "zip-file"). You will use this tool to submit your assignments to the SLATE dropbox. You will also sometimes use this tool to unpack a collection of files that your professor wants to give you for an exercise or assignment. For example, s/he might wish to give you a collection of images to use for a web site.
There are several free tools you can use. Note that for this course, we only accept .zip or .rar files, so if you choose a different tool, be sure that it's capable of creating standard .zip and/or .rar files with no password protection.
Here are a few I recommend. All of them are free: you don't need to pay for any of these.
HTML/CSS Editor
If you've already downloaded and installed VS Code in your Java class, you can skip this part, since you've already done it.
You need to have some kind of editor or IDE (Integrated Development Environment) that allows you to create and edit source code (HTML and CSS) for web pages. There are hundreds of free editors and IDEs, some more complicated than others. For this course, we will focus on VS Code (Visual Studio Code) but feel free to use something else. If you prefer to use a different IDE, it is assumed you are familiar with that tool and know how to solve any problems with it: your professor doesn't have time to help you figure out how to use a different tool.
You may not use a WYSIWYG editor (such as DreamWeaver, HubSpot, CoffeeCup, Editor.js, TinyMCE, etc.) for any assignments/evaluations in this course.
Download Visual Studio Code for your platform.
Just download the latest version of VS Code and install it. The installation process should be pretty straightforward.
You don't need any extra plugins or extensions, but let me know if you have a favourite that you think we should add to the course.
If you're ever on a different machine, you can always use a Free On-Line HTML Editor temporarily.
FTP Client
An FTP (File Transfer Protocol) Client allows you to upload and download files to/from a server. You will use an FTP client to upload and manage your files in your web space on the Dev.FAST web server. There are several free FTP Clients available, but I find FileZilla to be the easiest to use. If you don't like FileZilla, you can find something similar such as Core FTP or CoffeeCup (the same people who wrote the free HTML editor).
If you're given an option to download a "client" version or a "server" version, download the client version, because you'll be using it on your computer (a client) to upload to the server.
- FileZilla (the client version, since you will be using it on your own machine)
- Core FTP
- CoffeeCup FTP
Be careful! Some installers will try to have you install extra software you don't need. READ everything CAREFULLY!
You will need to configure your FTP Client to connect to your web space after you install it. You'll do this after you set up your web space (instructions are farther down).
Setting Up Your Workspace
You will be storing the files that make up your web pages on the laptop you use in class (and/or on your computer at home). If you have not done so already, you should set up a folder/directory on your system for your term 1 or term 2 (whatever is appropriate) courses. Inside that folder/directory, you should add folders/directories for all of your courses (e.g. web, programming, math, etc.) You can use whatever names you like for the directories - you can use the course code, for example. In the screen shot below, I was lazy and just used simple names like "Python" and "WebDev".
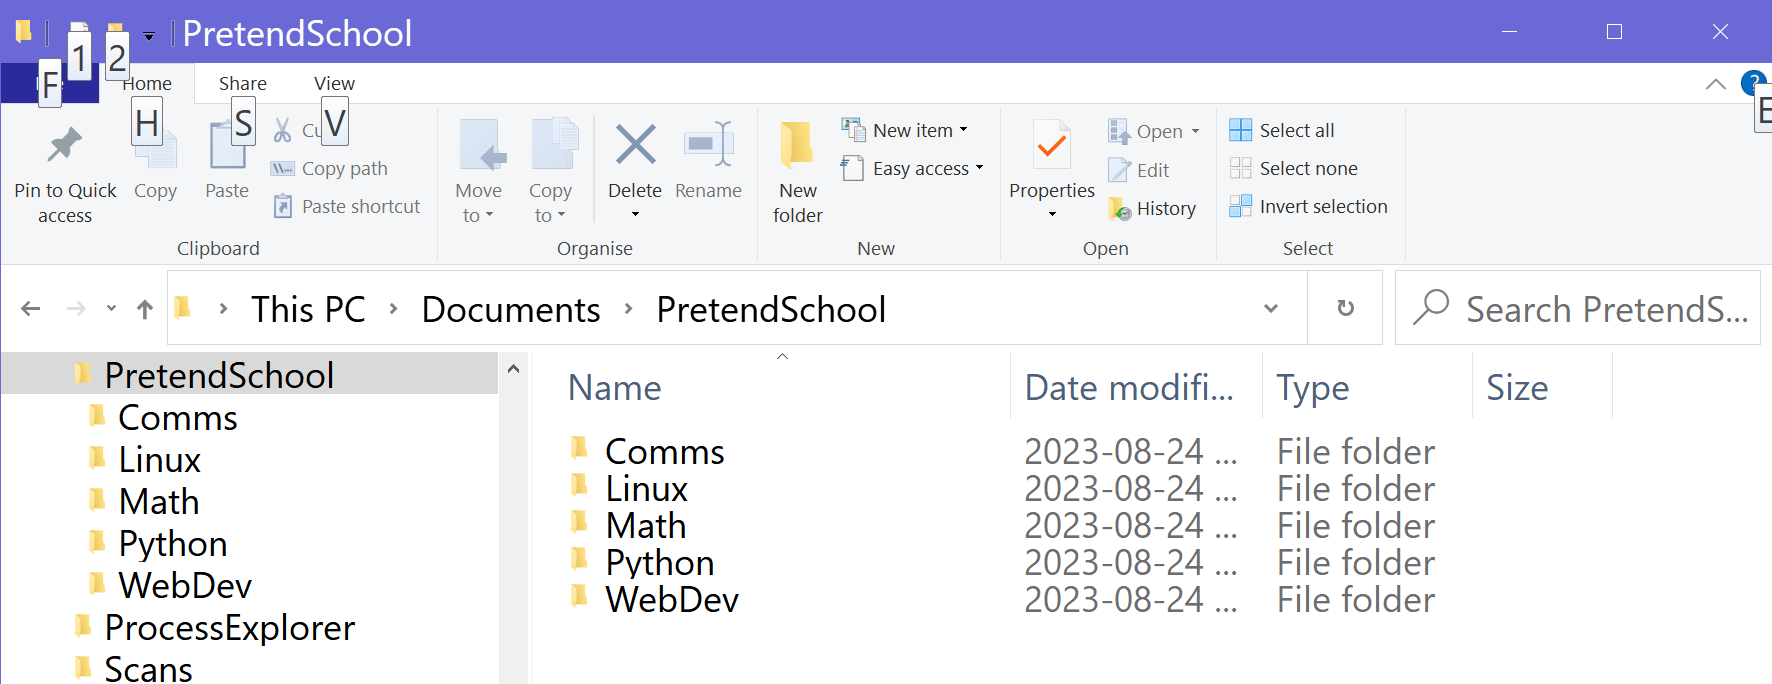
inside that directory add sub-directories for each course
Inside the folder/directory you created for this course, add an "assignments" (all lower-case letters) folder/directory. This is where you'll save all of your evaluated projects (graded exercises, assignments, etc.) You can store other stuff in the root web folder (e.g. in the "WebDev" directory) such as handouts, slides, and other files for the course. I also recommend setting up additional sub-directories for each week e.g. /week1, /week2, etc. Find some way to organize all your web projects so that you can easily find them (e.g. in week 8 I might say, "Open the project from week 4 with the navigation example...")
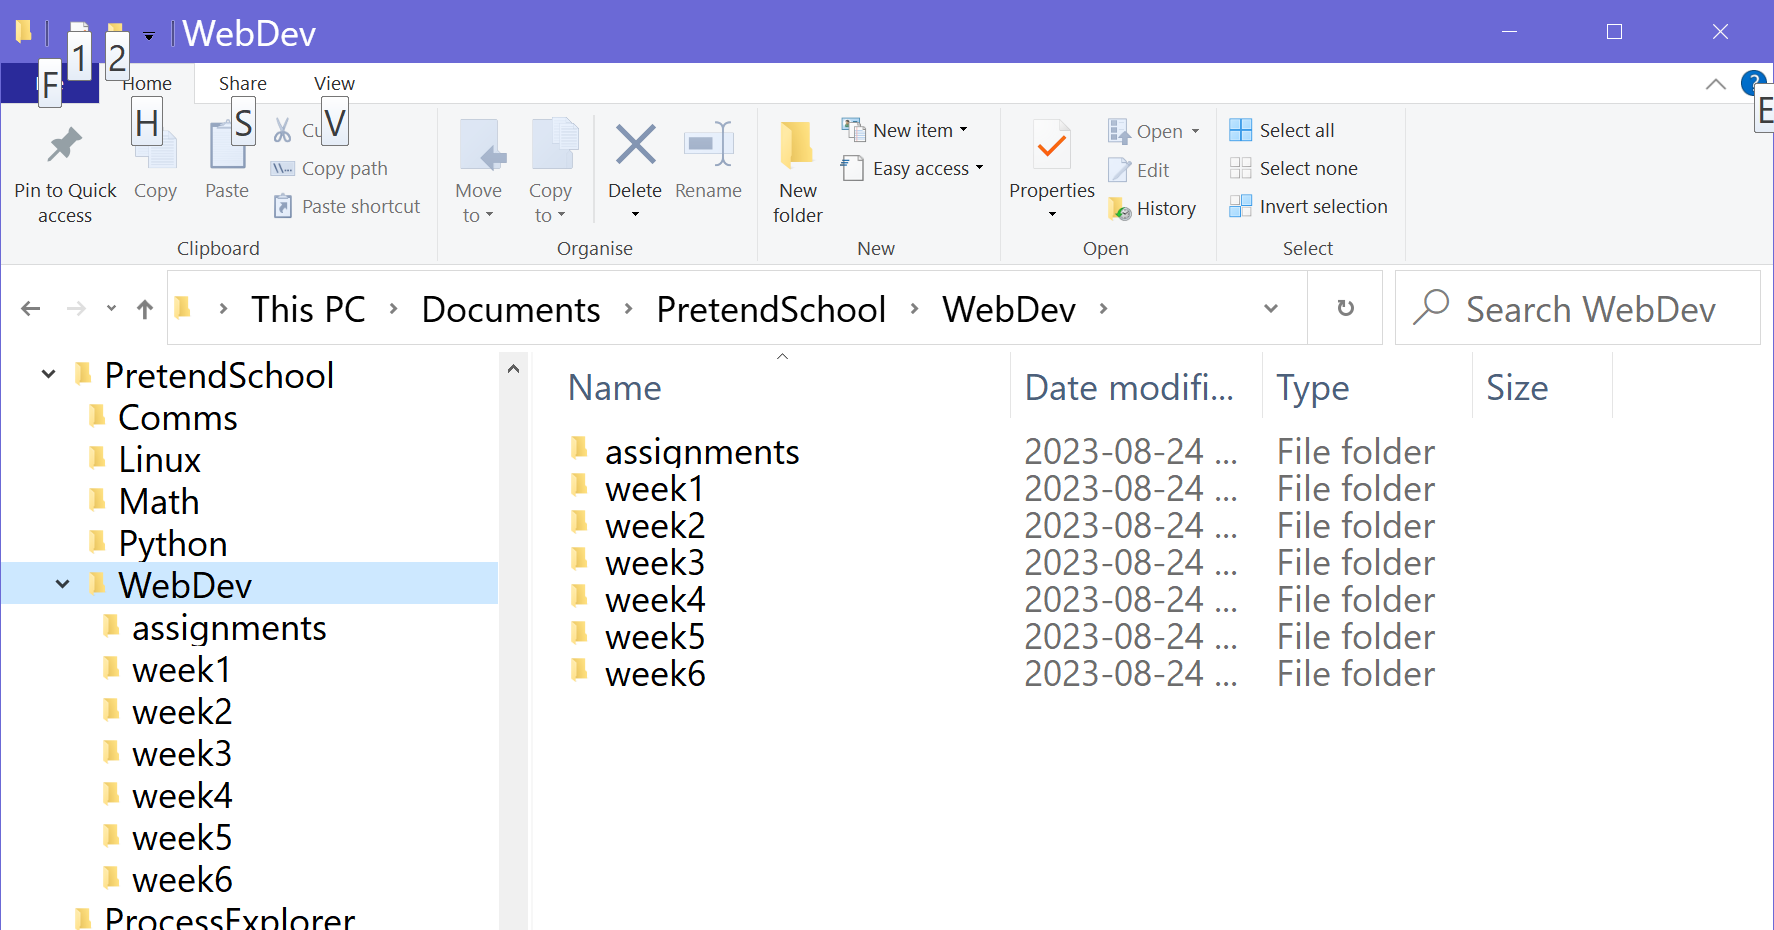
and directories for each week's work
You will be mirroring or cloning this file/directory structure on the dev.fast server. File and directory names on the server are case-sensitive!! If you do not follow the instructions regarding upper/lower-case letters, your web sites will not work with the URLs used in assignments, exercises, etc.
Once you set up your web space, the contents of your "WebDev" directory will be mirrored or cloned on the server: you'll have a directory there with copies of /assignments, /week1, /week2, etc. and all of the contents of those directories. This will make it really easy to publish your work on the server.
Setting Up Your Web Space
All assignments and exercises must be published on the Dev.FAST web server. You will be given space on this web server to publish your work. To obtain access to this space, follow the instructions below.
Accounts on the dev.fast server are deleted at the end of every term after grades have been submitted. To reset your account in a new term, just follow the instructions below.
The dev.fast web server uses a server software called cPanel. CPanel provides a graphical interface that makes it easy to manage directories and files, and also manage security settings, among several other things.
Summary of your Sheridan Credentials:
Email: login@sheridancollege.ca
UPN: login@shernet.sheridancollege.ca
User name (Login name): the first 8 characters of your email/UPN; whatever you put for "login" in the above.
Example:
if Din Djarin's UPN is djarindi@shernet.sheridancollege.ca,
then Djarin's email is djarindi@sheridancollege.ca and
Djarin's user name or login name is djarindi
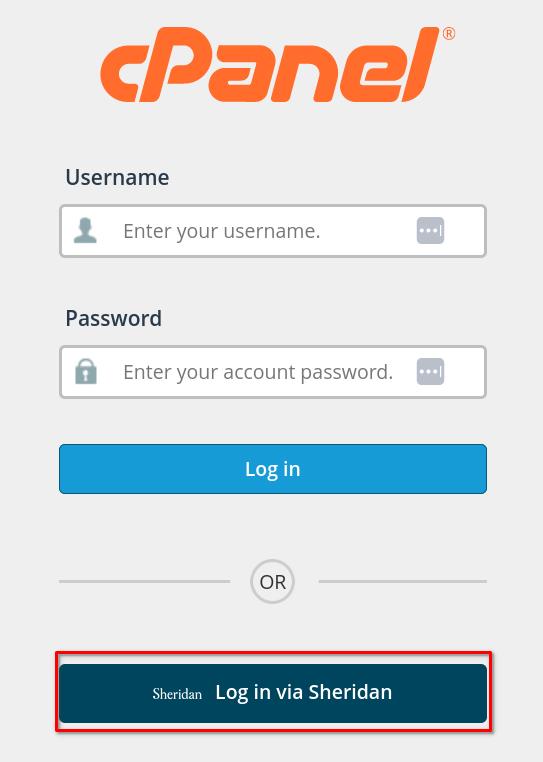
To set up your web space account, simply go go Dev.fast cPanel (https://cpanel.dev.fast.sheridanc.on.ca) and click on the "Log In Via Sheridan" button at the bottom. Then sign in using your Sheridan user name (not the UPN or email address) and password. The first time you sign in during a new term, your account is automatically created.
If you have any technical issues with the dev.fast server, ask your professor first. Include as much detail as possible and any screenshots and/or error messages.
If your professor can't solve the issue, log in to Service Sheridan and fill out a "Report Issue". Please include as much detail as possible and any screenshots and/or error messages so they can assist you as quickly as possible.
To manage your web space and the utilities using the browser and web interface, go to https://cpanel.login.dev.fast.sheridanc.on.ca.
If you see the "Choose a Starting Point" screen, just click the SKIP button.
The main cPanel page has many categories of tools. Each of these categories is collapsable, so you might want to collapse them all as you search for the tools you want - it makes it easier to search for things!
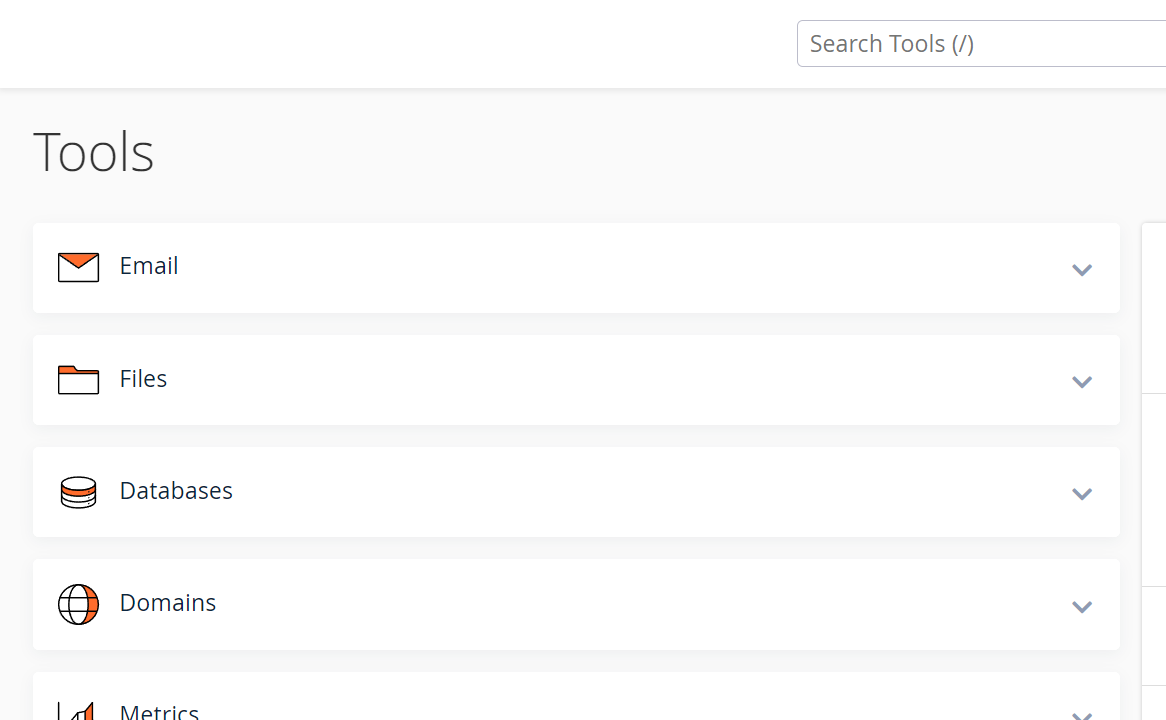
While using the tools, you can return to the main tools menu at any time by clicking the "Tools" link on the far left side of the page.
Change File Settings (Mandatory)
There are a few file settings that need to be changed:
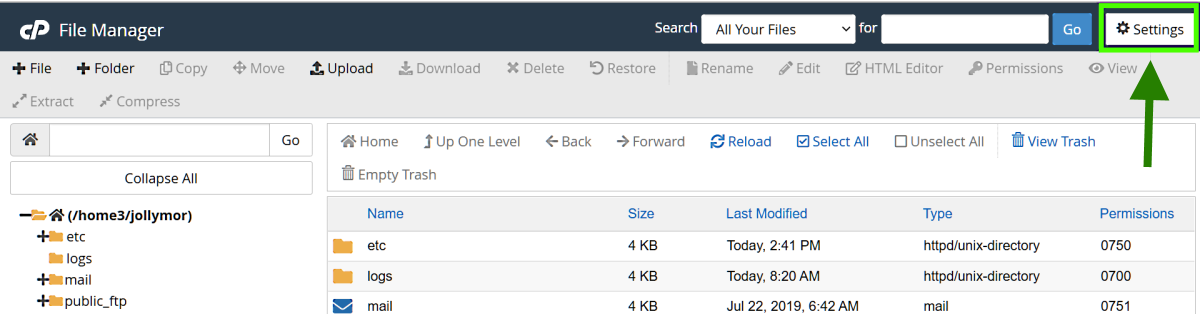
- On the cPanel page, find Files > File Manager.

Find the File Manager tool - Click the "Settings" icon in the top-right of the main
cPanel window.
Click the SETTINGS button on the top-right. - For "Always open this directory in the future by default:" select Web Root (public_html or www)
- Check off Show hidden files.
- Click the SAVE button to save your changes to the
settings.
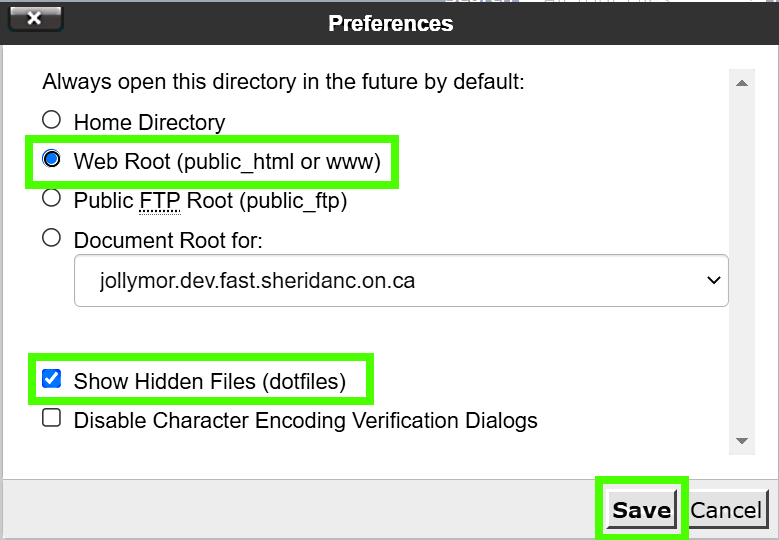
Set the Web Root as the default and show hidden files.
Once you have your web space set up, you can upload your files/projects. If you're using an FTP client (e.g. FileZilla), you'll have to do some additional setup. However, an FTP Client is a lot easier to use and way more convenient! If you have issues with FTP clients or just don't want to use one, you can upload using the cPanel File Manager instead. Choose your set of instructions:
First, you need to configure your FTP Client to connect to the web server so you can upload and manage your project files. The instructions below use FileZilla, but they should be similar for other FTP clients.
Setting Up the FTP Connection
FileZilla is one of several FTP clients you can use to upload (publish) files to your web space on the dev.fast server. You can also upload files using cPanel, but using FileZilla is much faster and easier.
One disadvantage is the initial setup to work with the dev.fast server: Sheridan's network/software uses SSO (Single Sign On) for its authenticaion - you can use your Sheridan credentials to log into any part of the system. This is very convenient: previously, students would have to create a separate password just for the dev.fast server. Using SSO means you only have to remember your Sheridan login information (login name, email address, UPN, and the password). However, in order to allow FileZilla to allow connections to the dev.fast server, you will have to create a SSH (Secure Socket Shell, or just Secure Shell) cryptographic key. This key will make sure that the FileZilla connection coming from a computer to your dev.fast server account is actually you, and not someone else - it's an extra layer of security that is required in order to allow a non-Sheridan application to connect to one of the Sheridan network resources.
Many thanks to Bob Pearce and the FAST Tech team for streamlining this process and providing the following instructions! <3
Create the SSH Key
TL;DR: First, we'll create the SSH key and give it to FileZilla. This key consists of a public key and a private key. The public key is used to encrypt data before that data is sent to the receiver. the receiver uses the private key to decrypt the data. When a client and server start to communicate, they need to agree on and exchange these keys before any messages or data are exchanged. So you will use a cPanel tool to generate a public and private key pair for you. Then when you connect to cPanel using FileZilla, any data it receives from the dev.fast server will be encrypted using the public key, and it will decrypt the data with the private key (and vice versa).
- If you're not already logged in, go to https://cpanel.dev.fast.sheridanc.on.ca/ (opens in a new tab/window) and scroll down to the "LOG IN VIA SHERIDAN" button. Click "Log in via Sheridan" and enter your Sheridan credentials (your UPN and Sheridan password) and do the verification if necessary.
- If you're logged in, you should see the main
landing page:

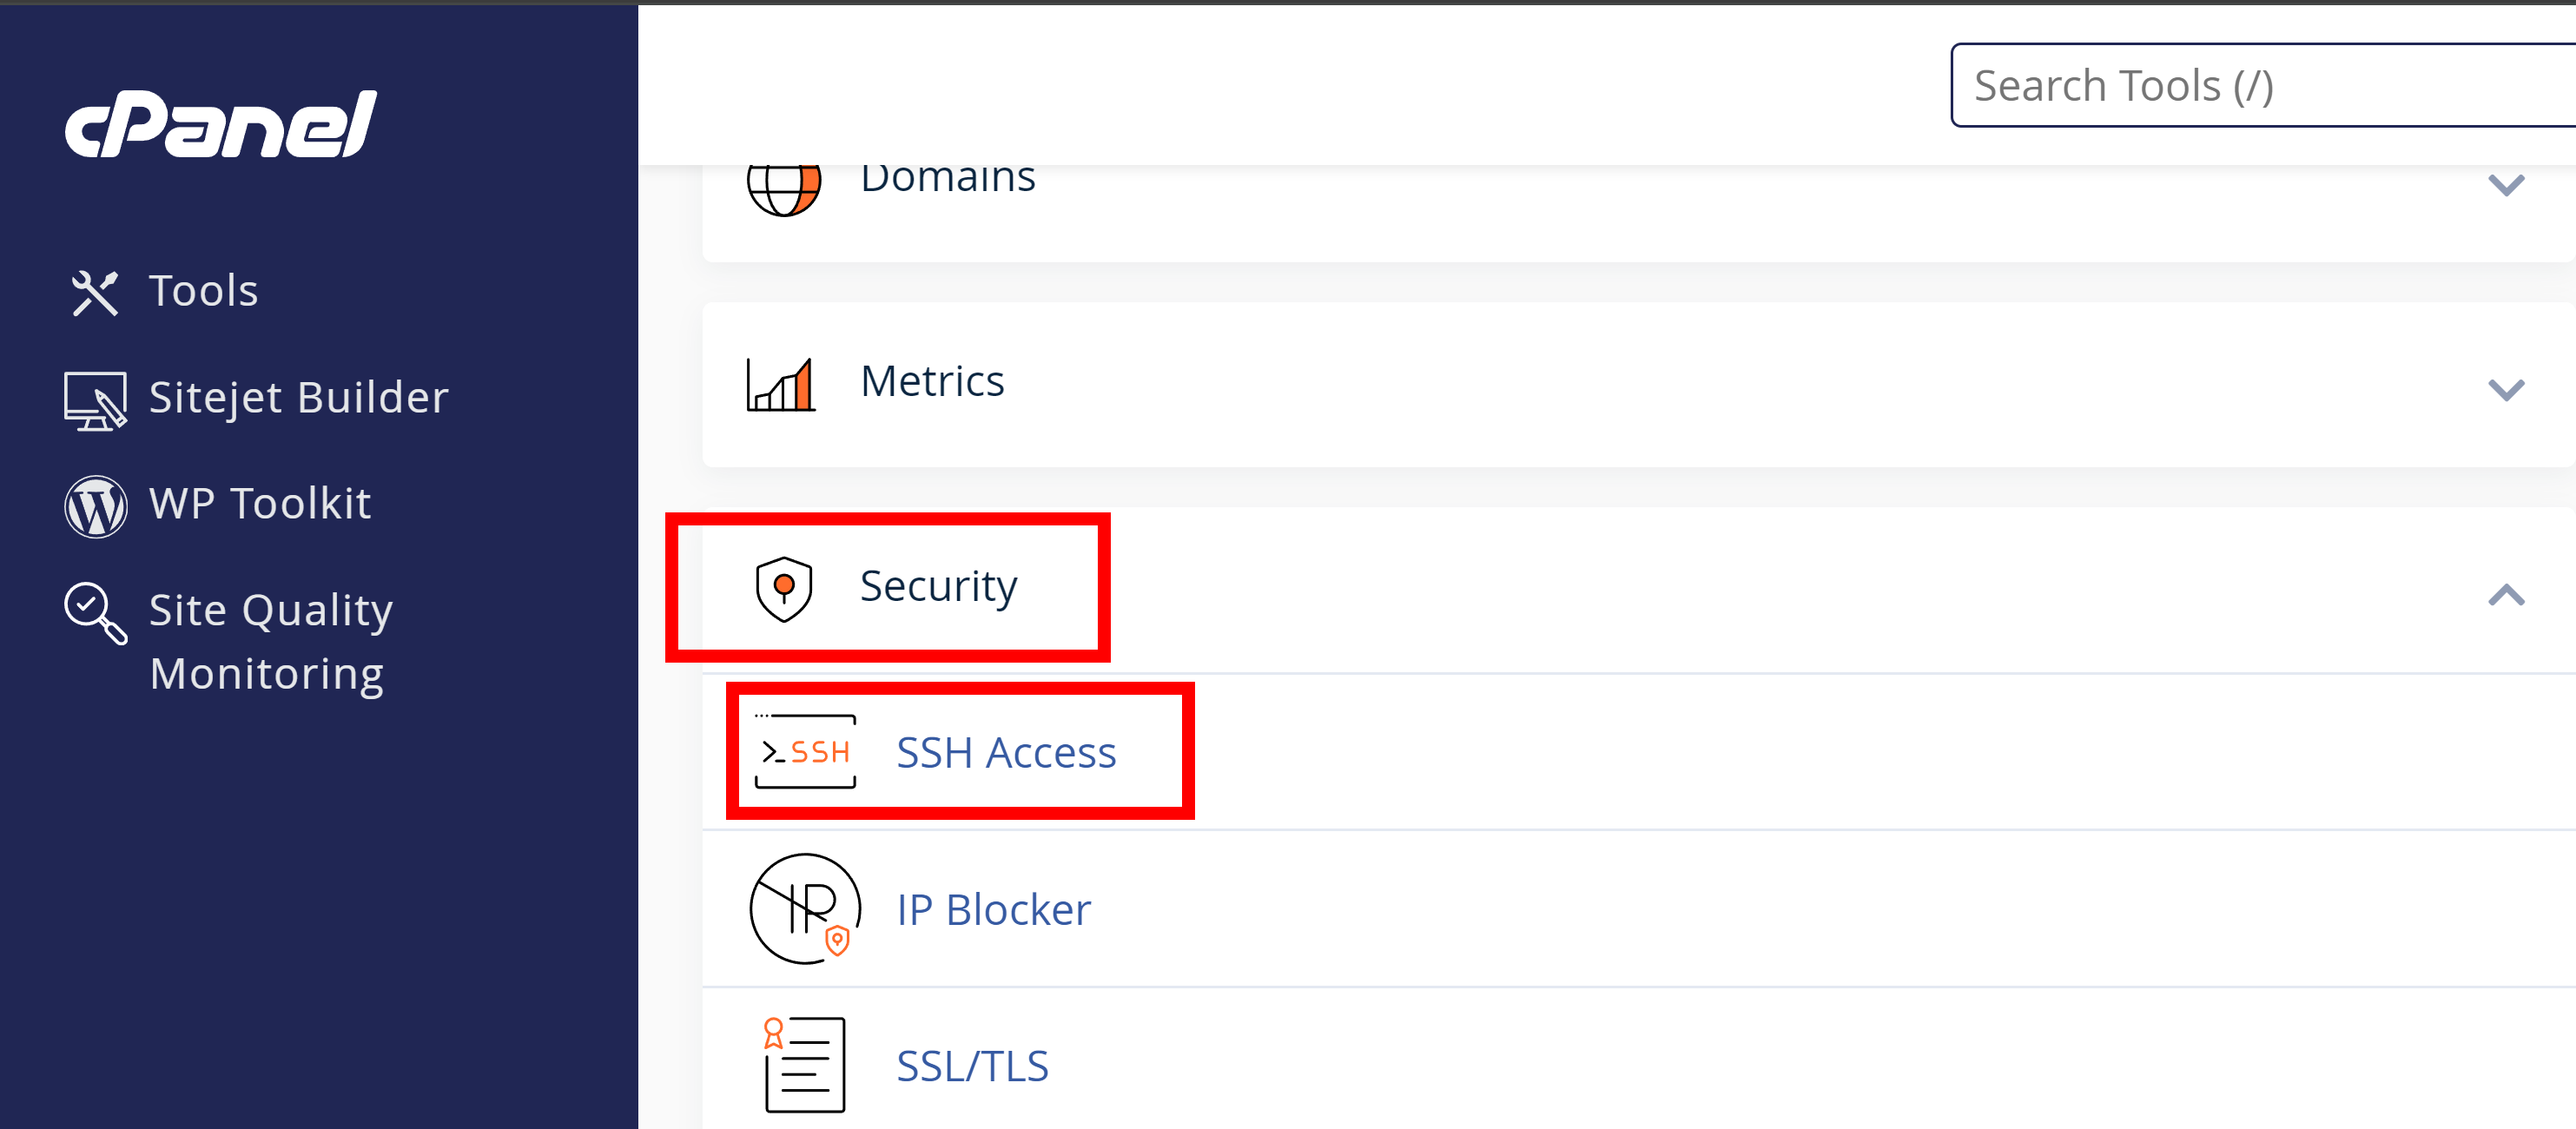
cPanel main landing page - Scroll down the page: you'll see various tools with icons separated
into categories or sections. Find the category/section called
Security and click on the tool labeled SSH
Access.
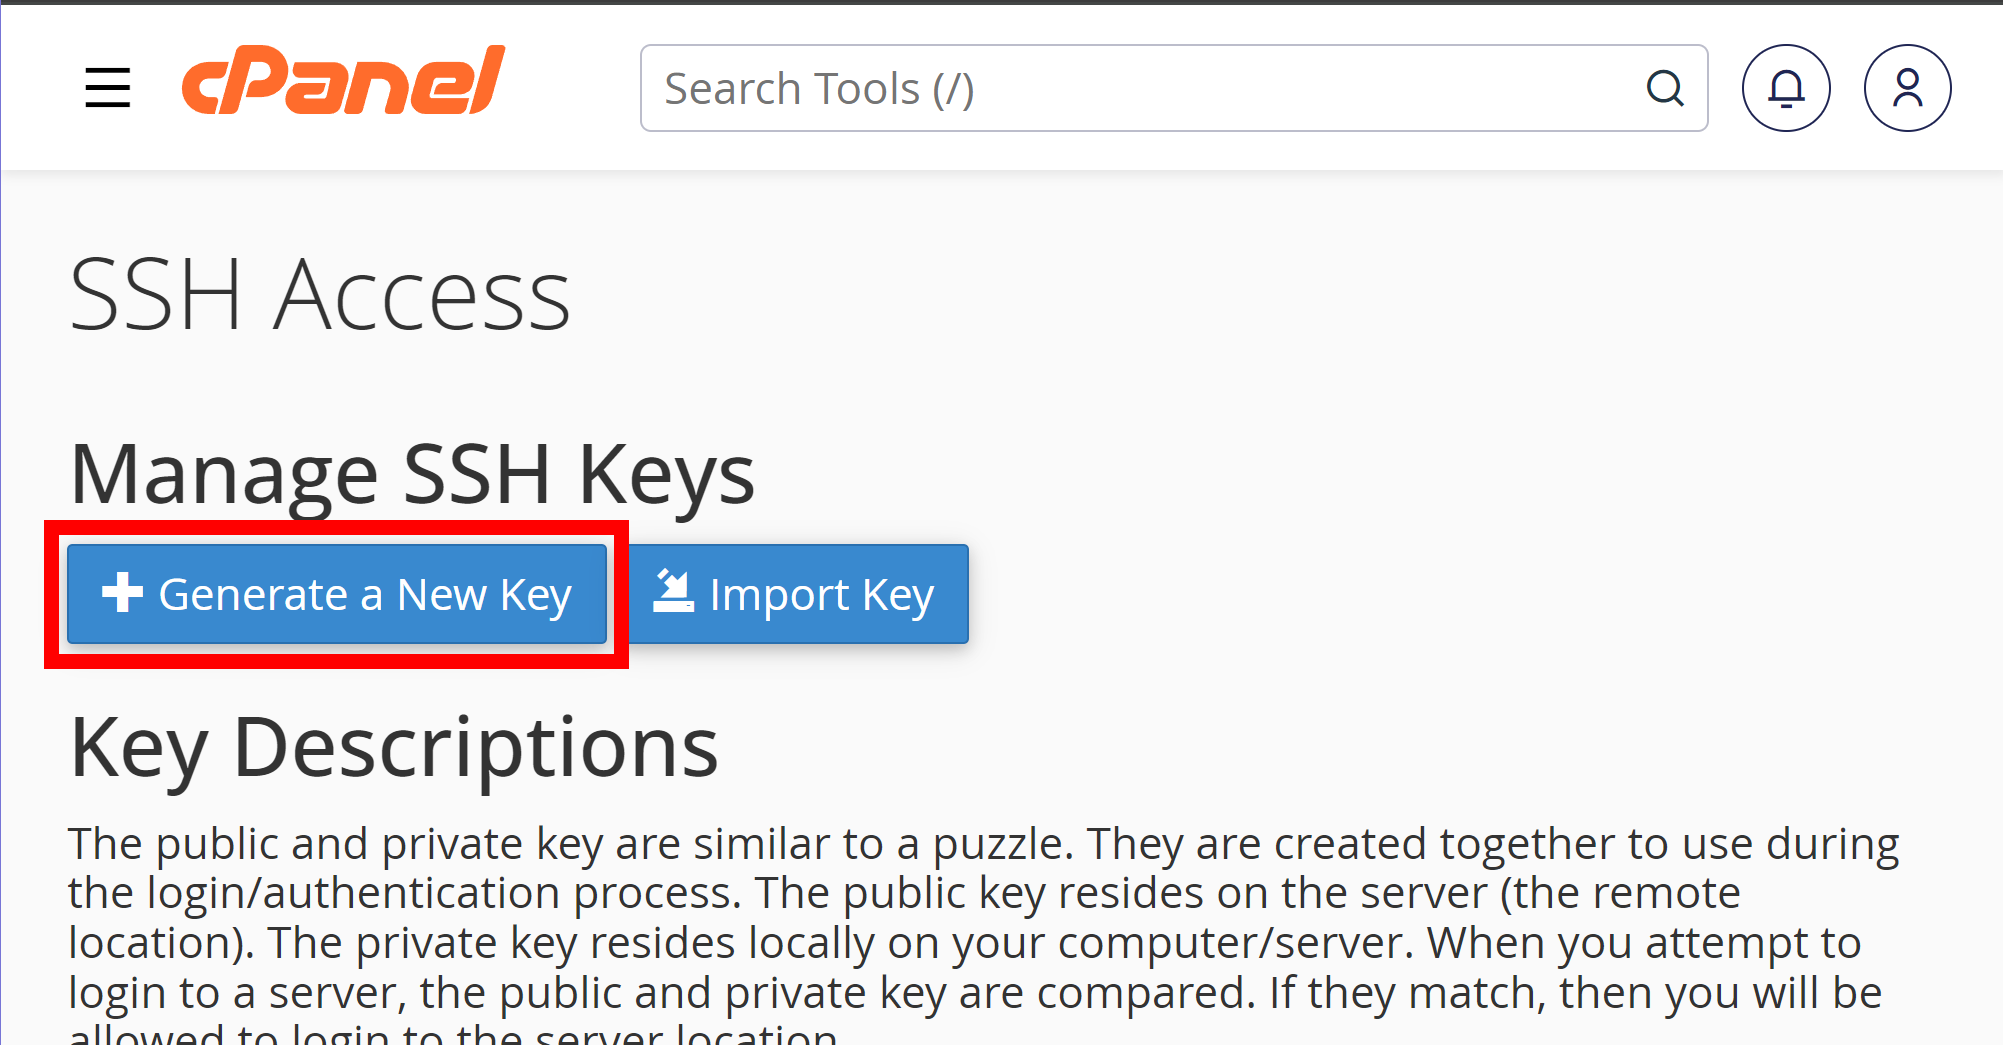
Click SSH Access in the Security section - Click on the button titled "Manage SSH Keys"
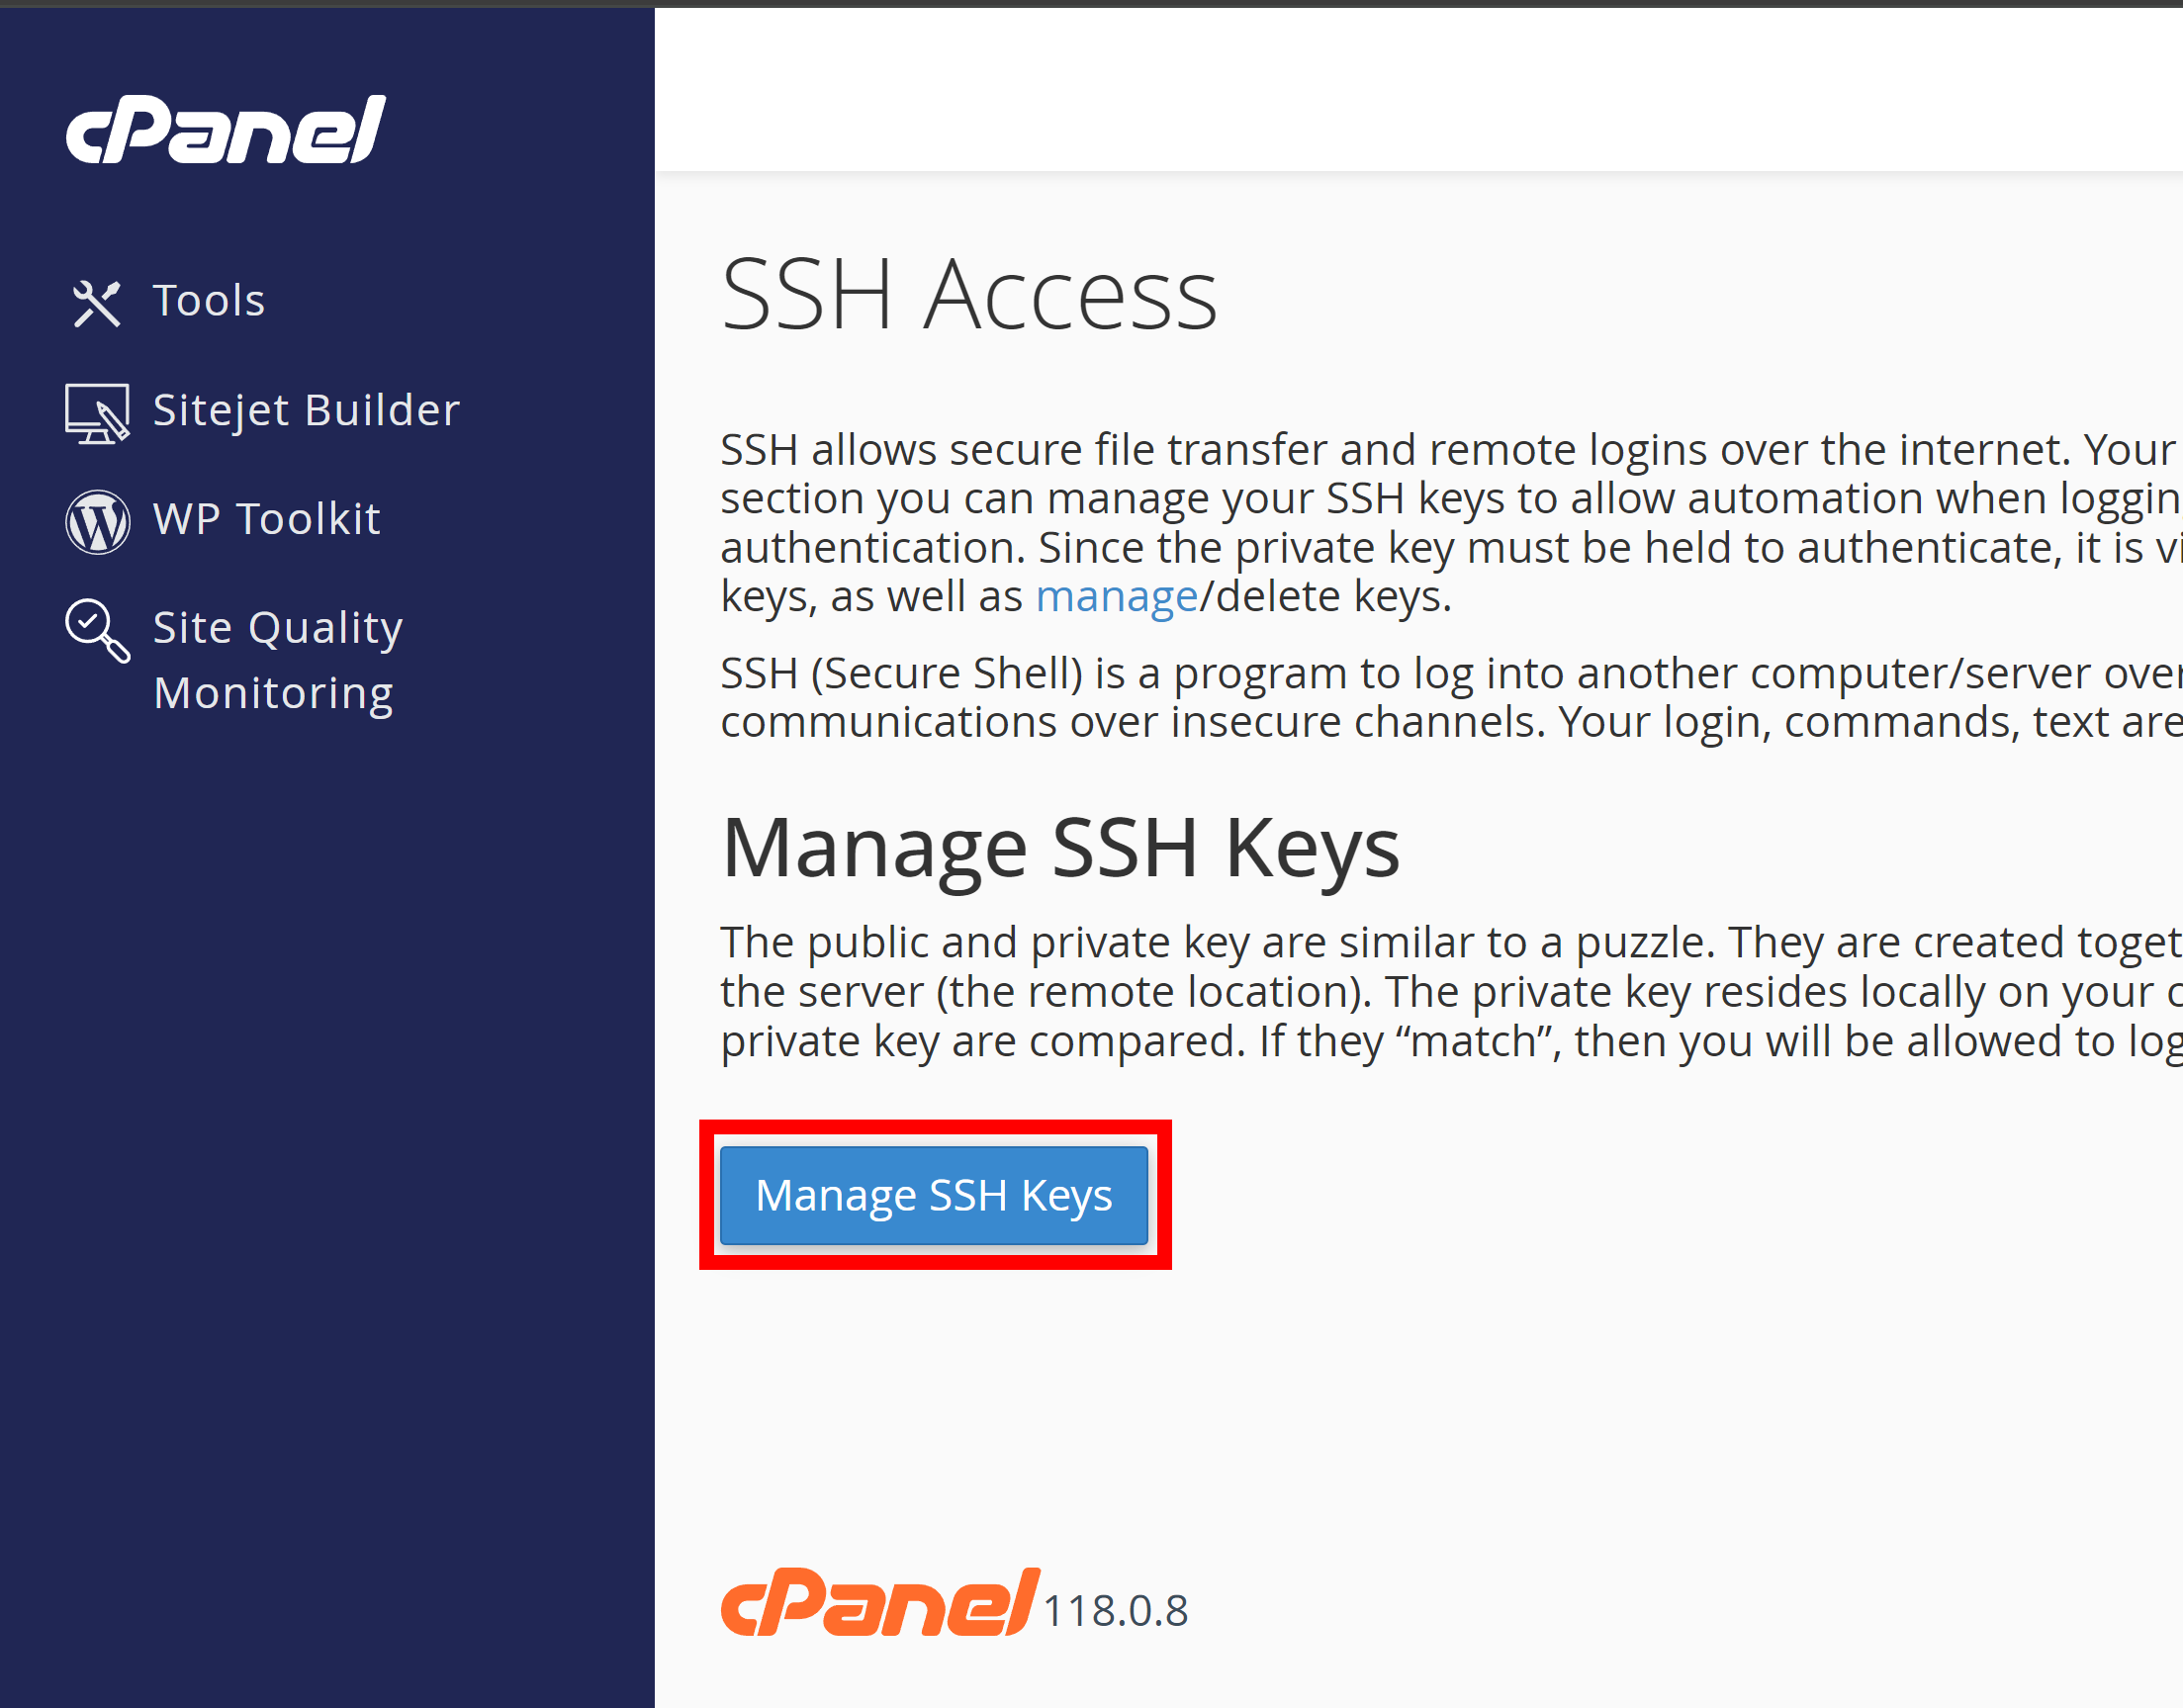
Click Manage SSH Keys button - Now you can create your SSH Key: click on the button with the
text "+ Generate a New Key".
Click Generate a New Key button - Now you will need to enter a key name: you could call
it whatever you like but it is suggested you use
cpanel_keyso you can easily find or recognize it at a later date, and it will make troubleshooting easier. - Enter and confirm a password for your private key. For the rest of
the instructions I'll call this your key password.
Make sure you use a strong key password. Feel free to use
the password generator on the screen
if you like. Record your key password somewhere safe and secure, because
you'll need it for the next set of steps.
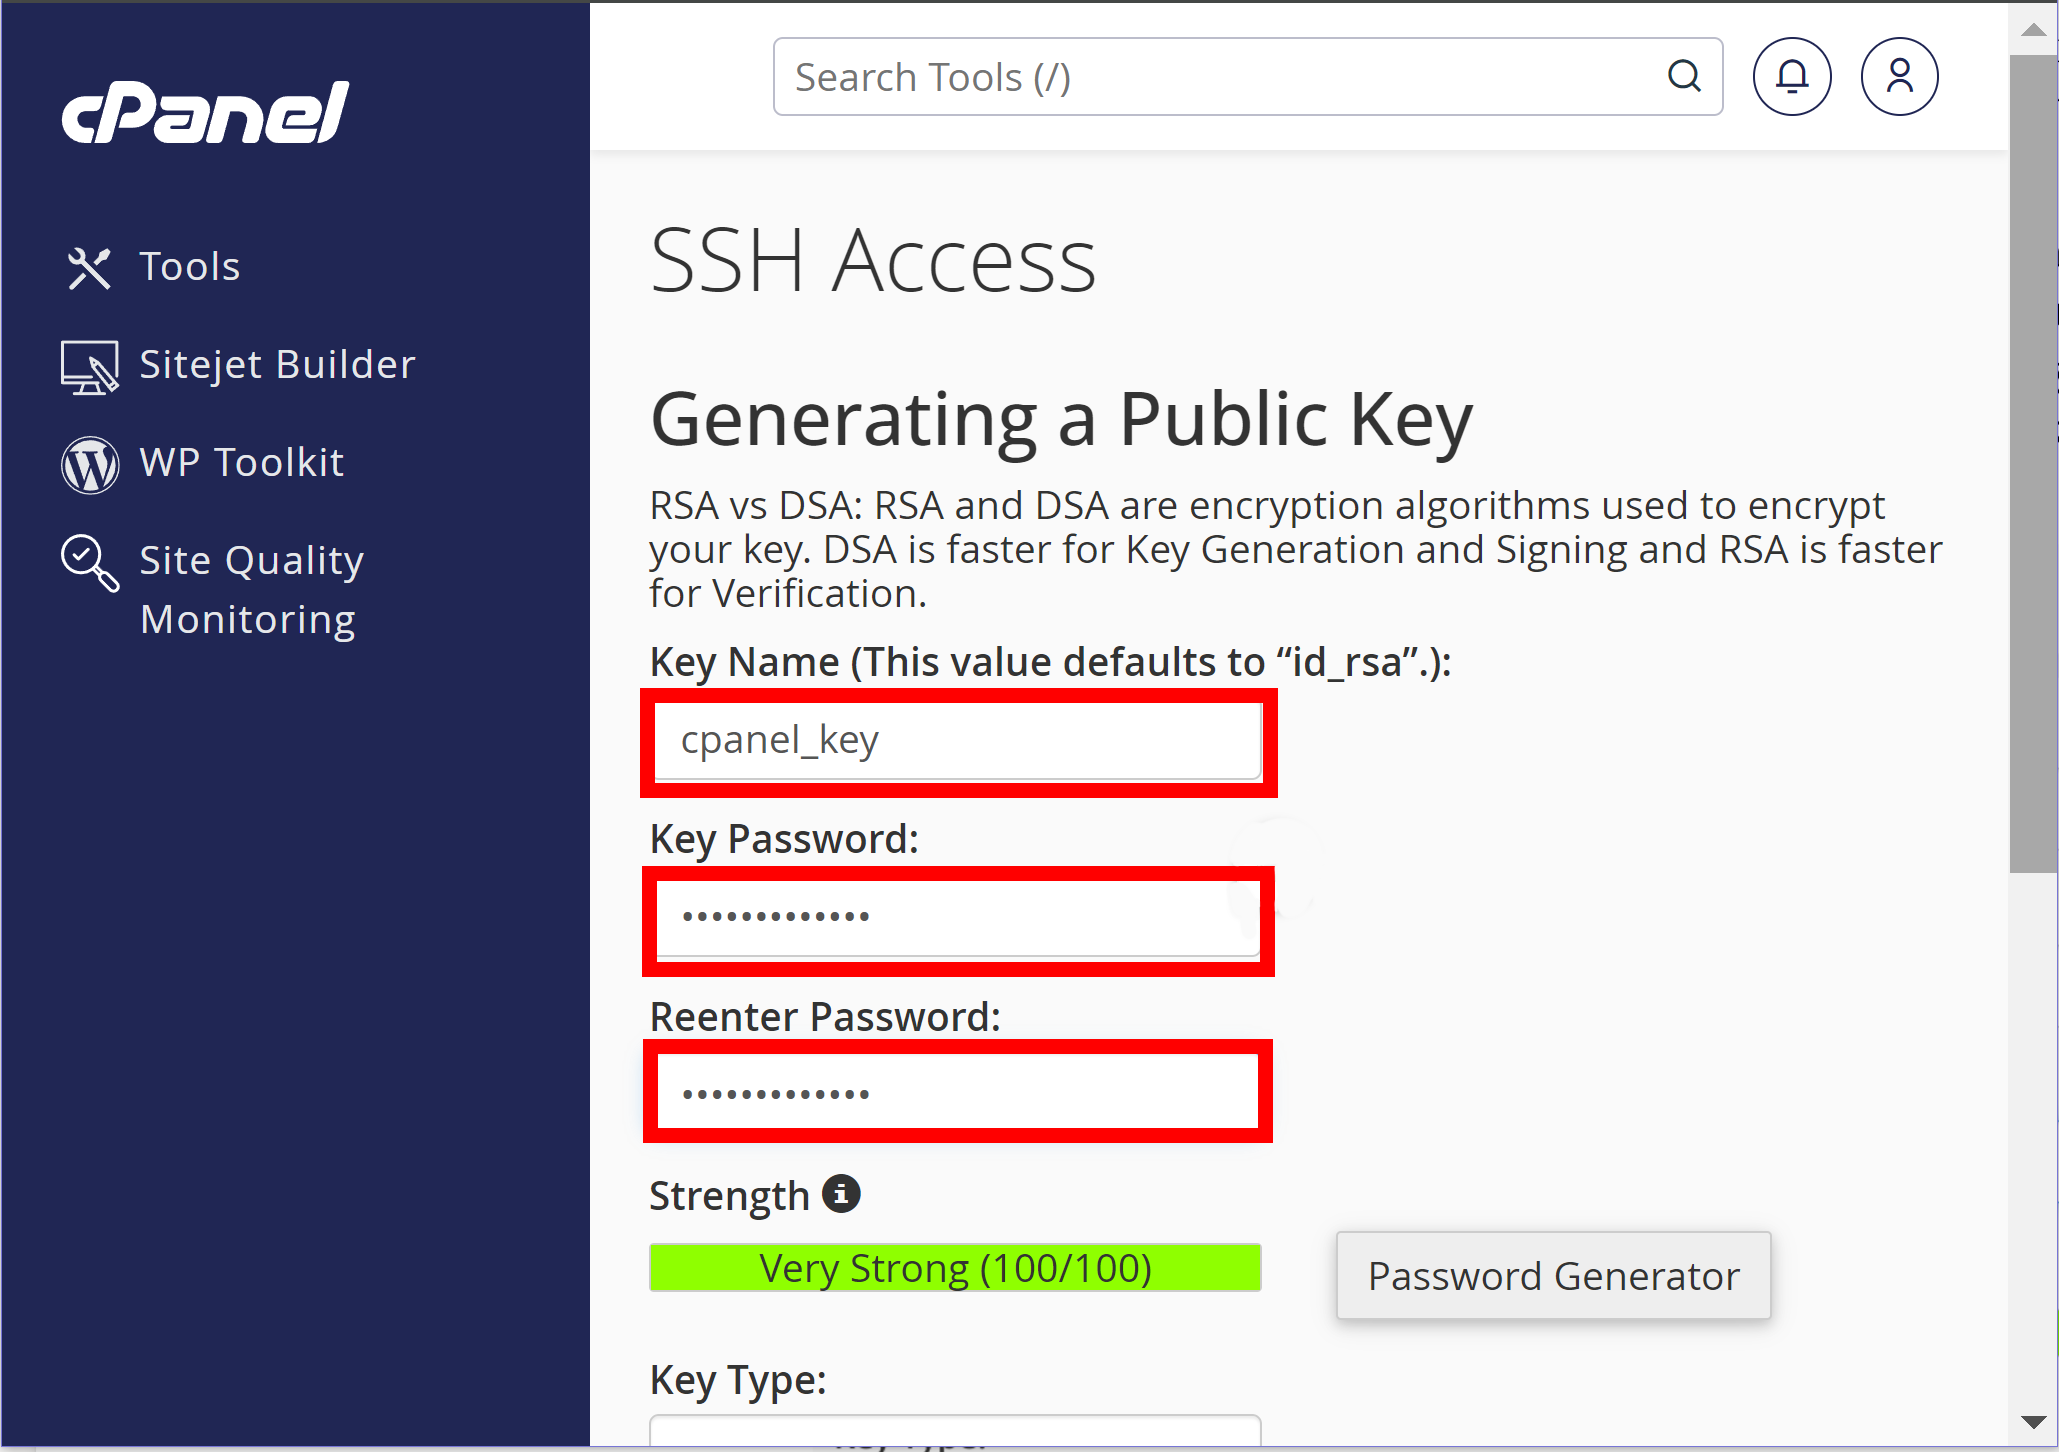
Use the Key Name cpanel_keyand choose a password - Leave the rest of the fields alone: the default key type of RSA and key size of 2048 are ok, you don't need to change those. Click the Generate Key button near the bottom.
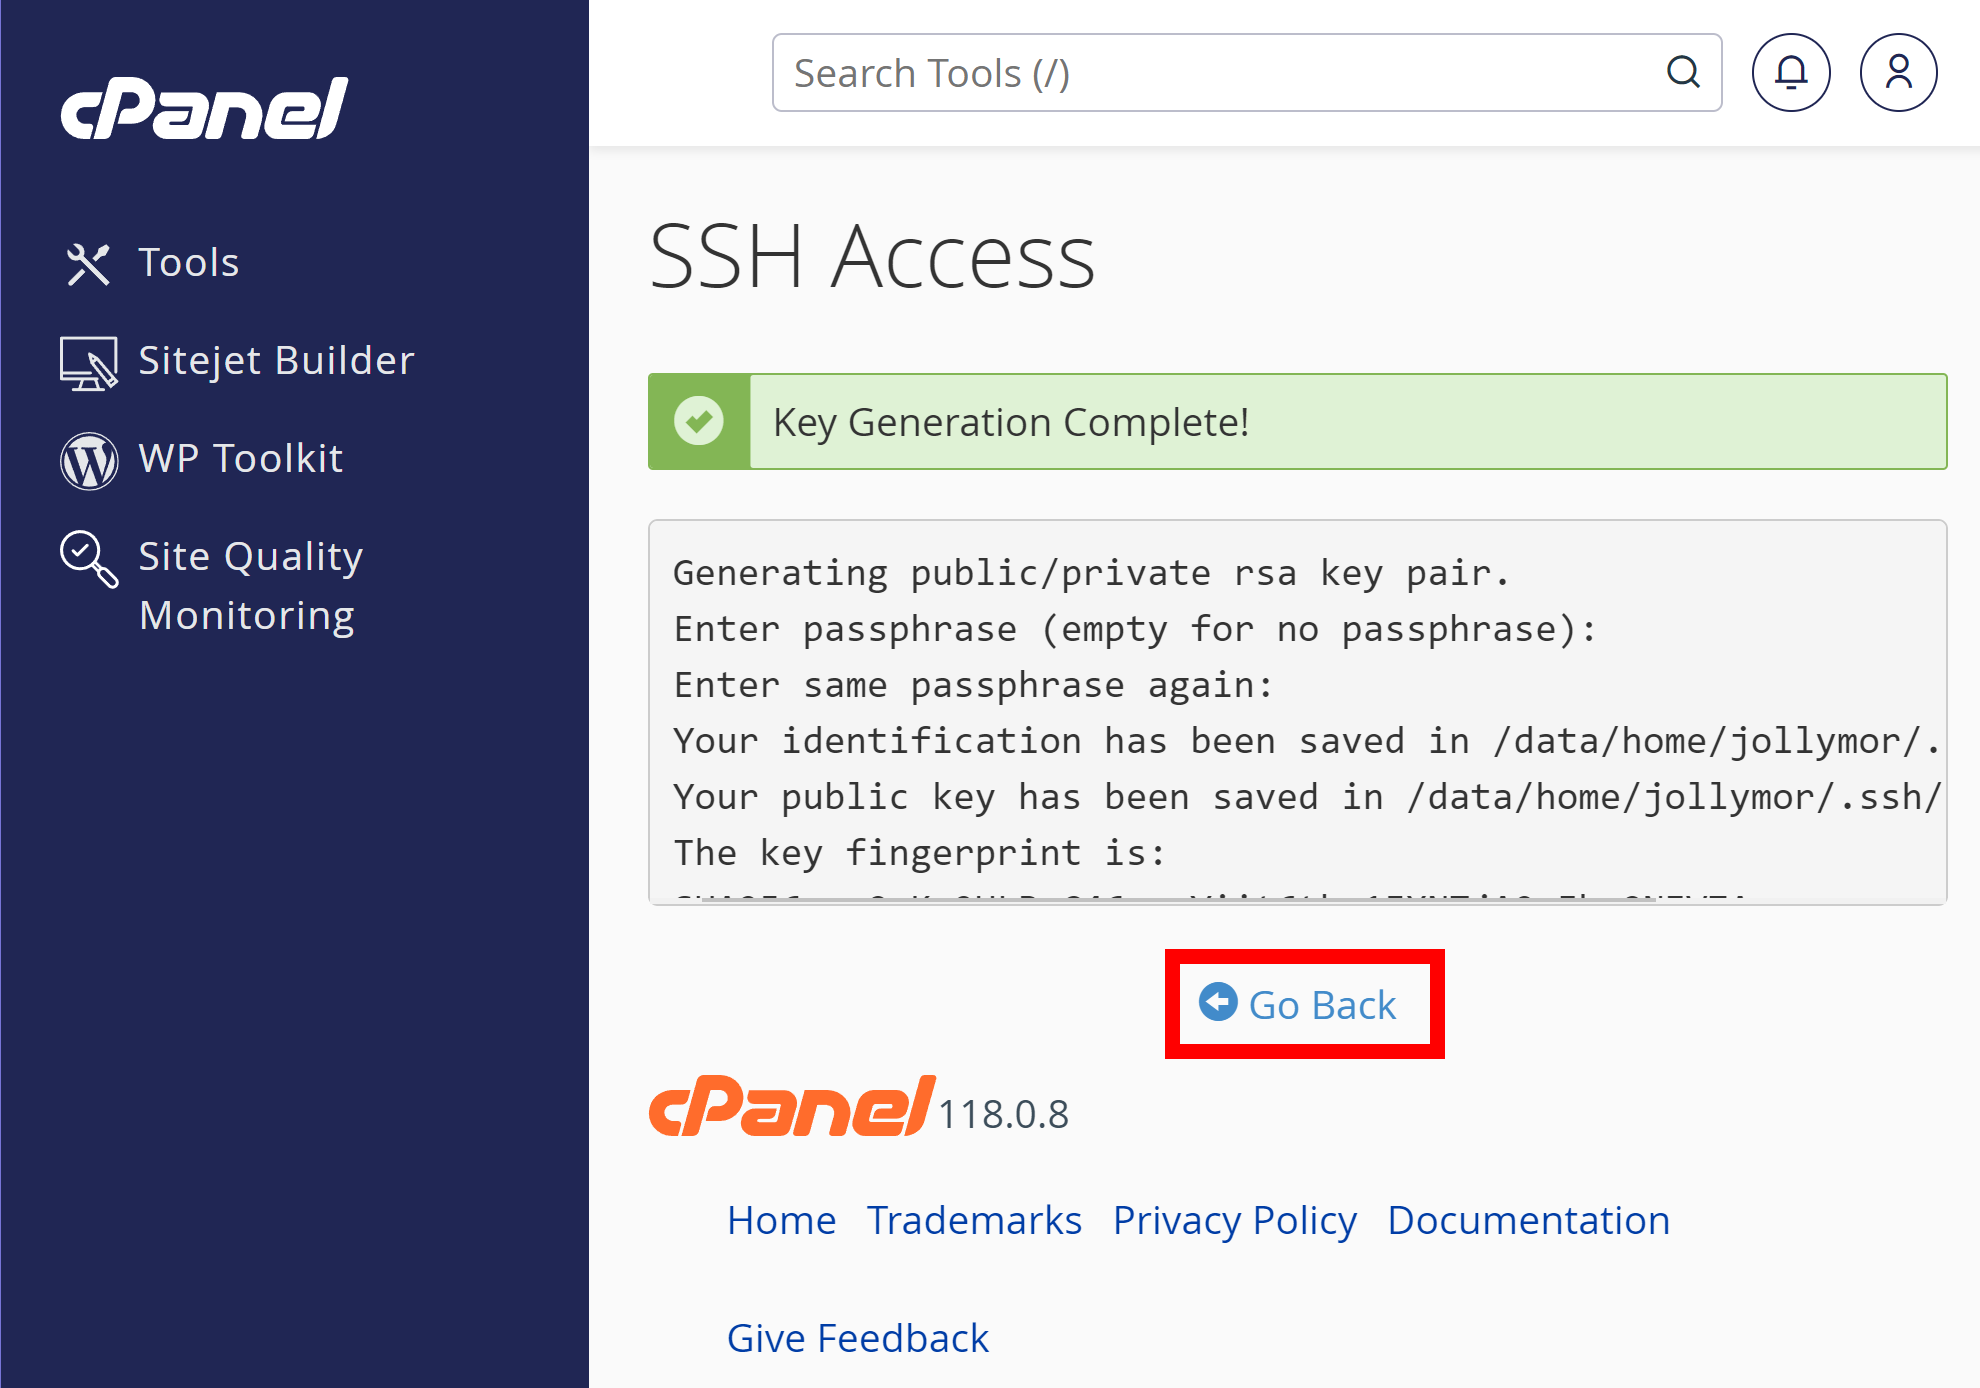
- The next screen should show the message "Key Generation Complete" along
with a box full of what looks like a lot of seemingly random characters:
that's fine. Below the box, look for the Go Back link
and click it to return to the Manage SSH Keys page.
You've generated your key: go back to the manage keys page - Now you should see your
cpanel_keyin the "Public Keys" area and "Private Keys area. However, in the Public Keys area it's Authorization Status is shown as "not authorized". Click on the link titled Manage to the far right of your cpanel_key Public Key.
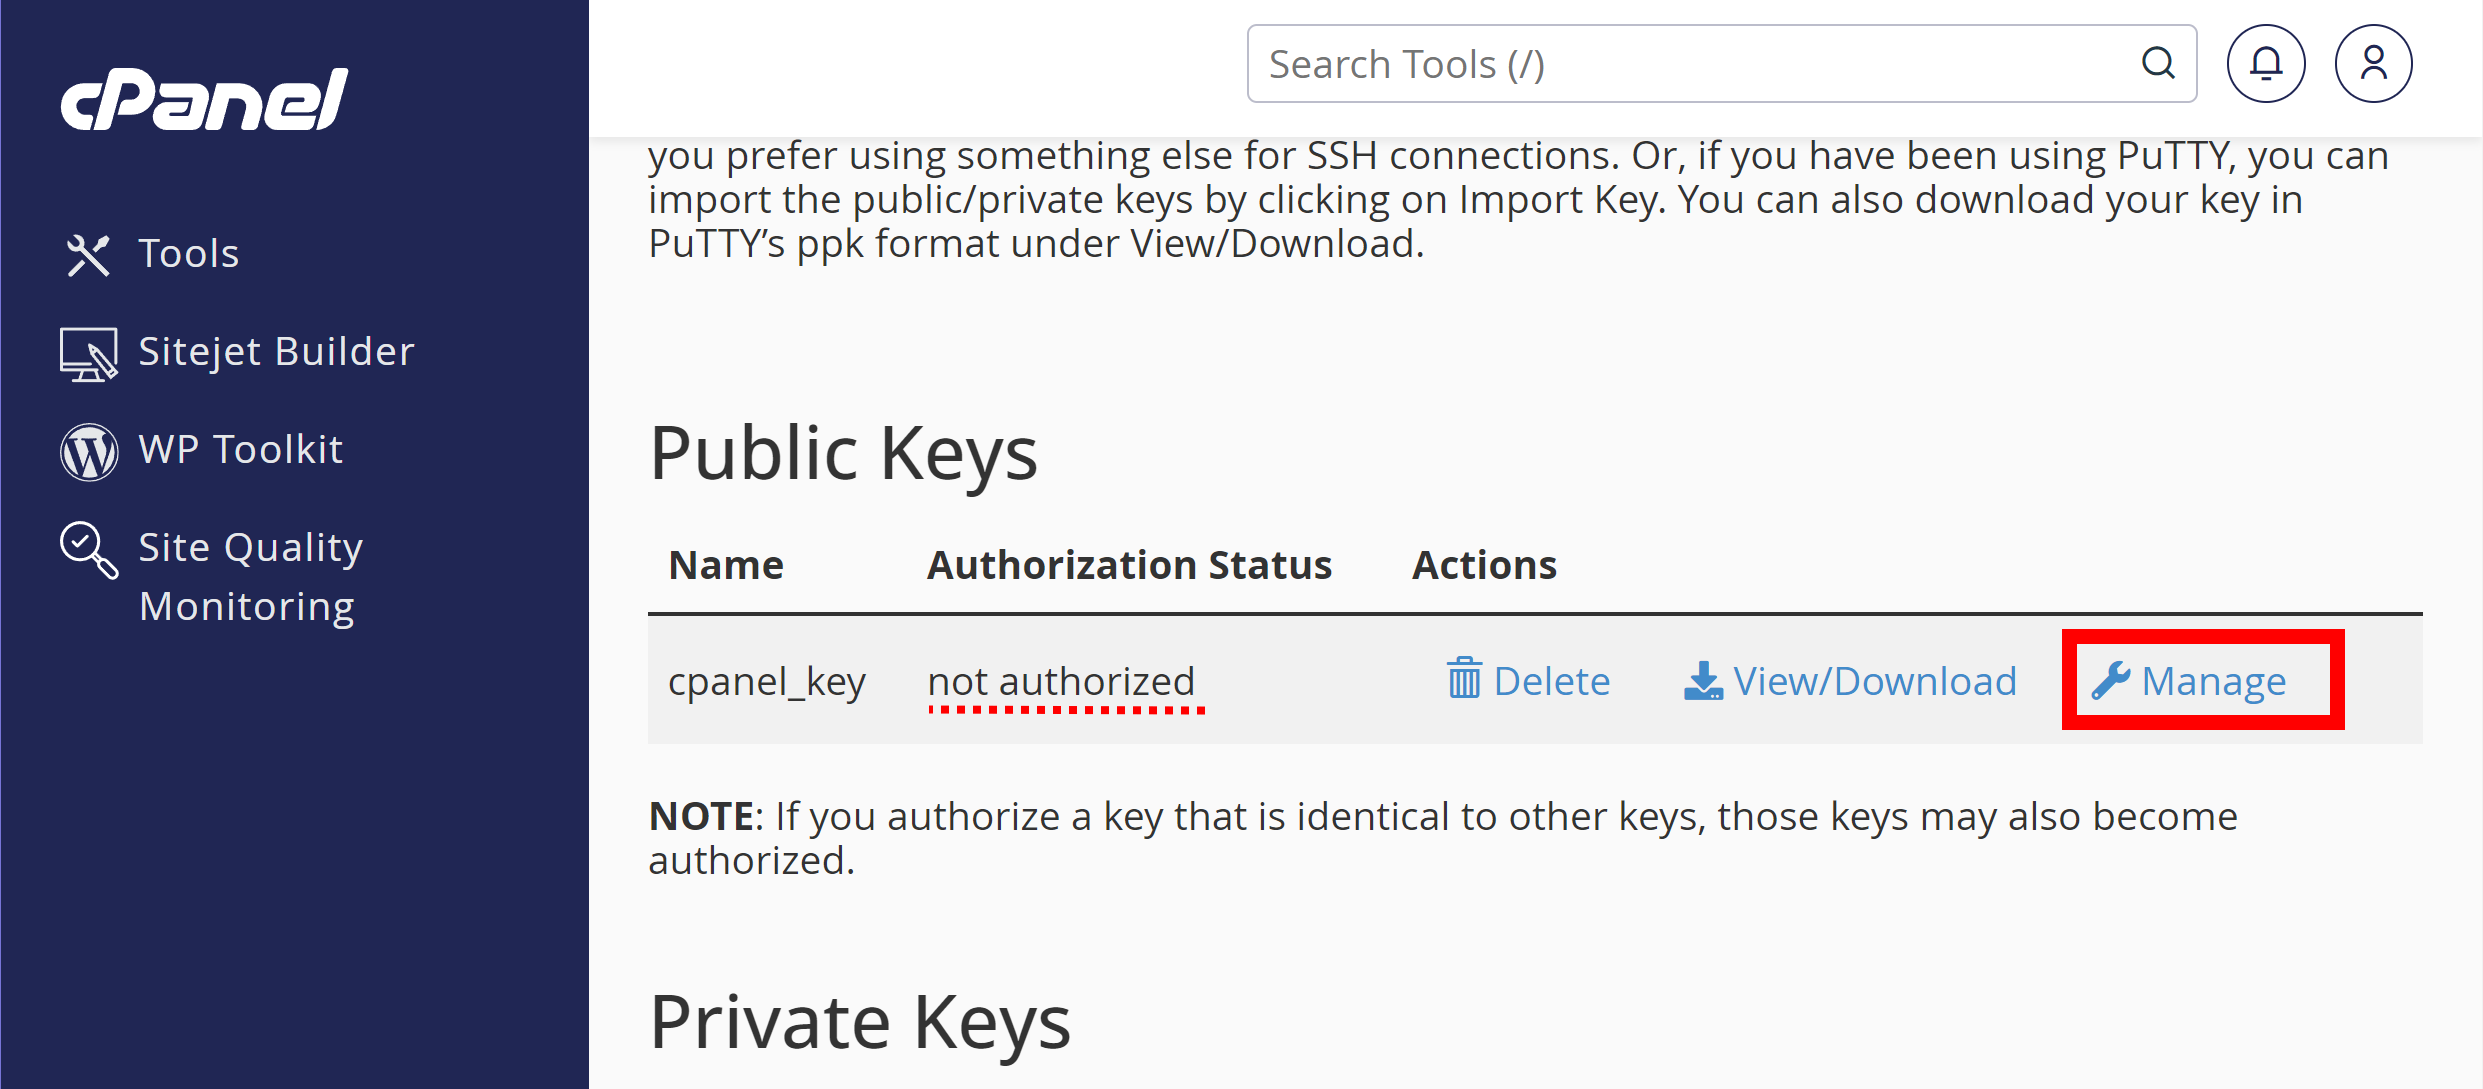
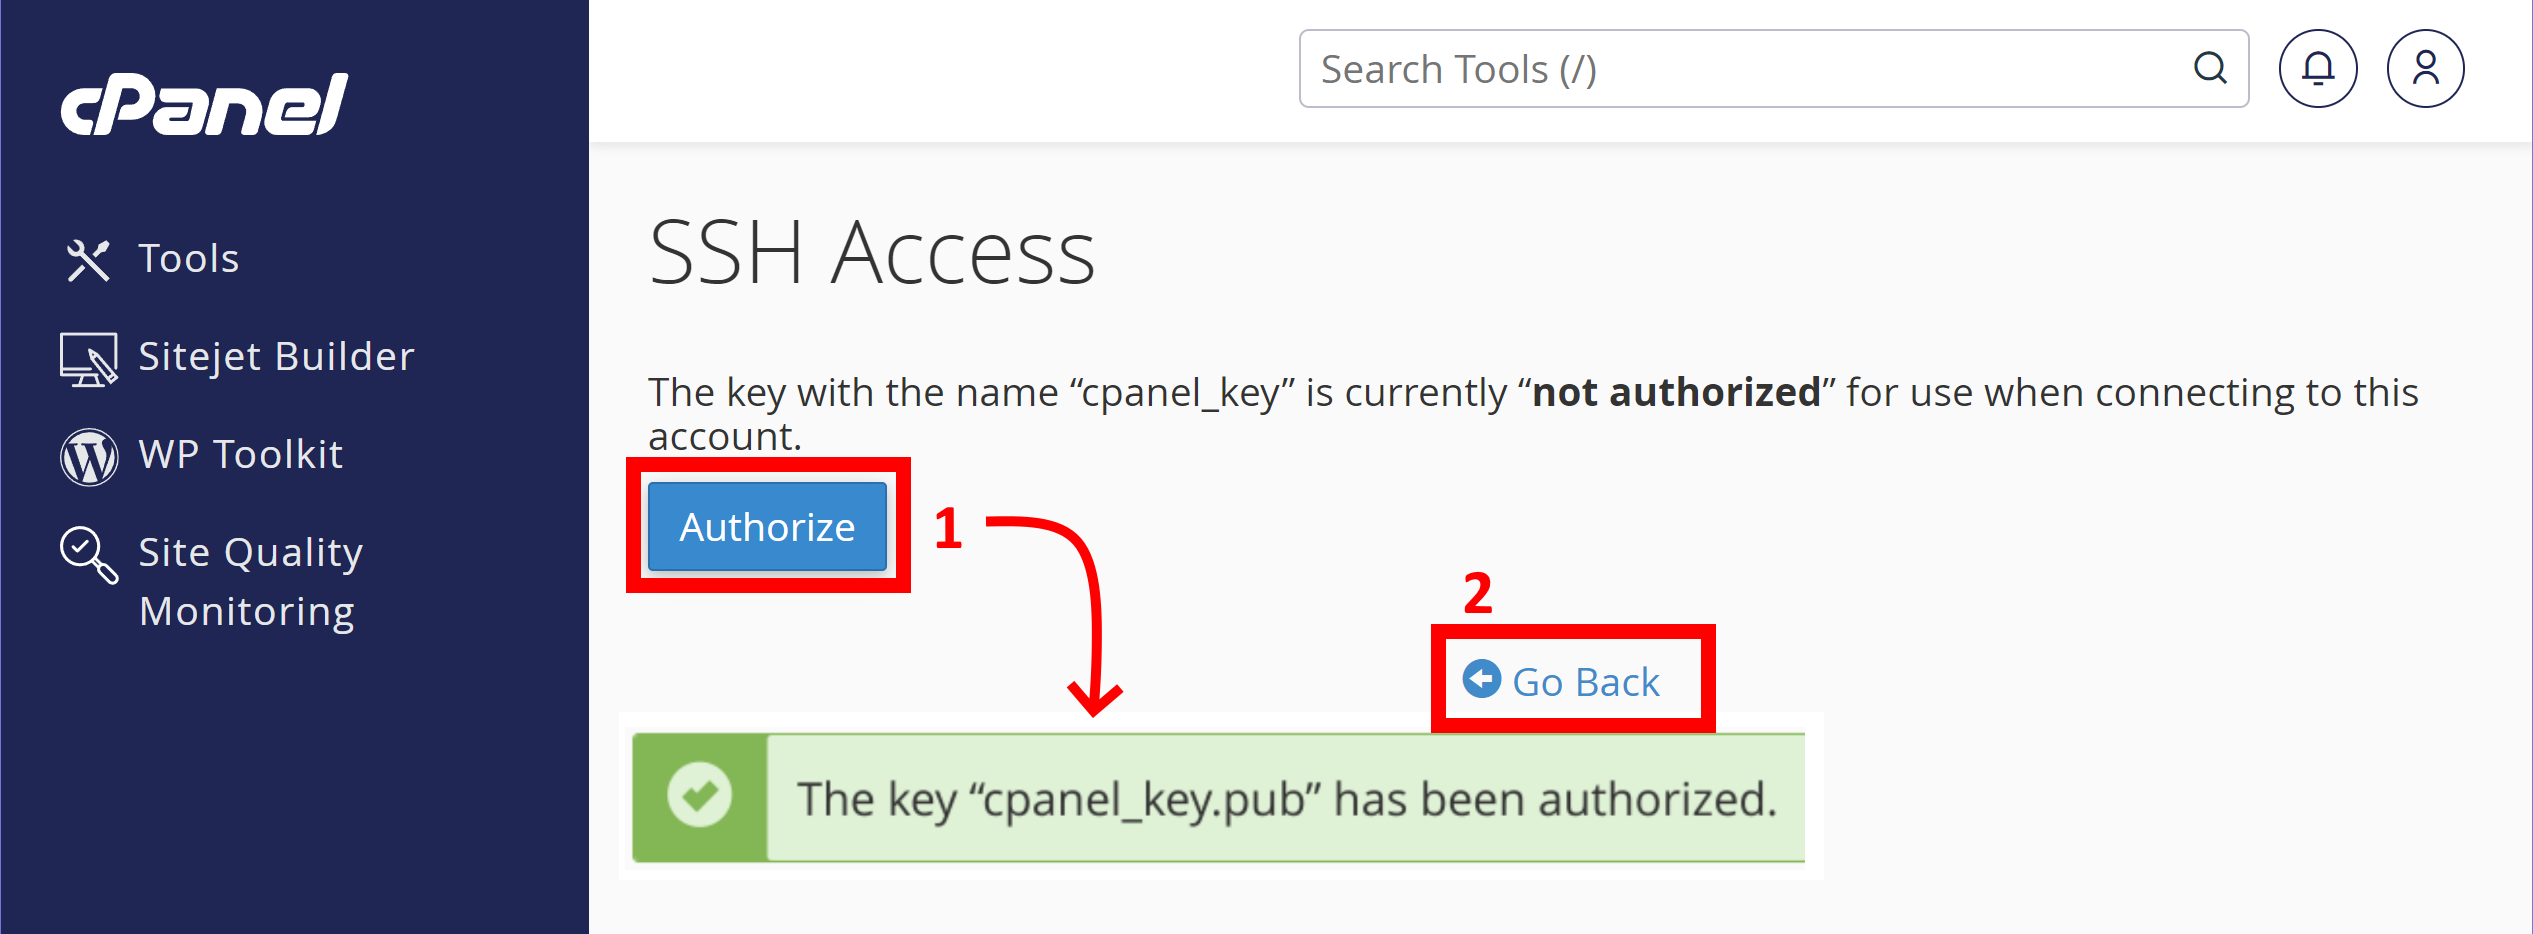
The key is not authorized: click on Manage to fix this - Now you'll see a screen that says "The key with the name 'cpanel_key' is currently "not authorized" for use..." Click the Authorize button to authorize the use of this key. This will allow you to use it in FileZilla.
- After you click the Authorize button, you should see a message
that says "The key 'cpanel_key.pub' has been authorized."
Now click on the Go Back link to return to the
previous page.
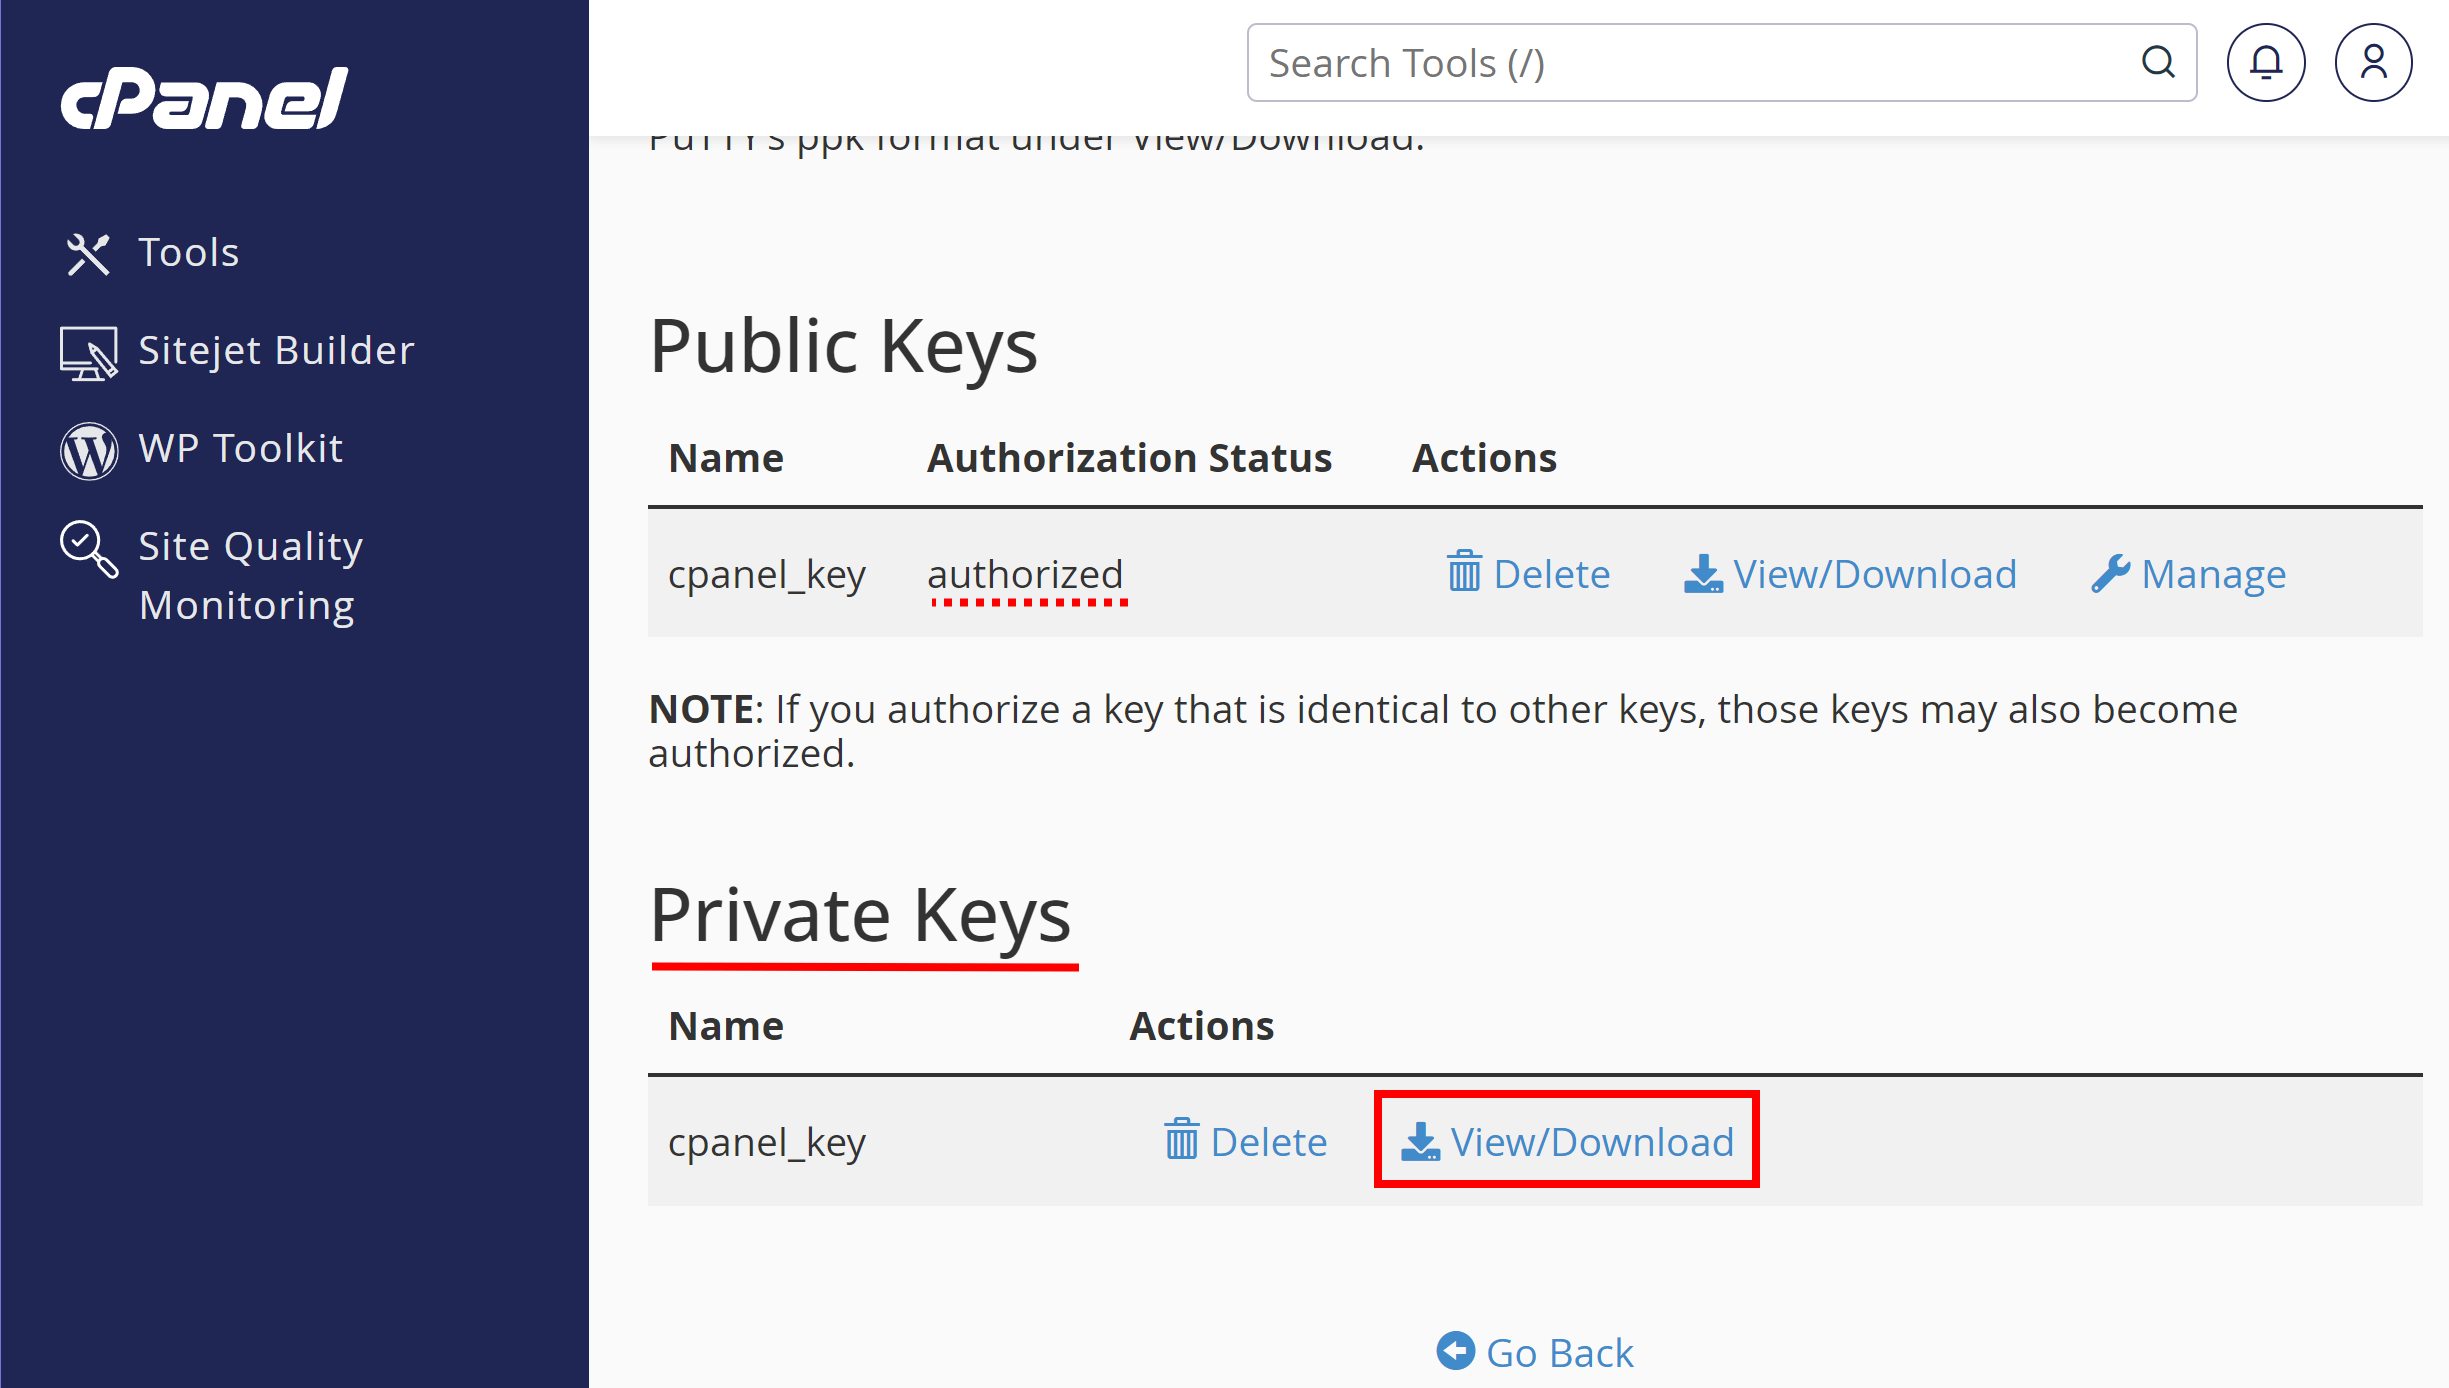
The key is not authorized: click on Manage to fix this - Back on the previous page, you'll now notice that the cpanel_key
is listed under "Authorization Status" as "authorized".
Now you need to download the private key so you can give it to
FileZilla: Click on the "View/Download" link under Private
Keys.
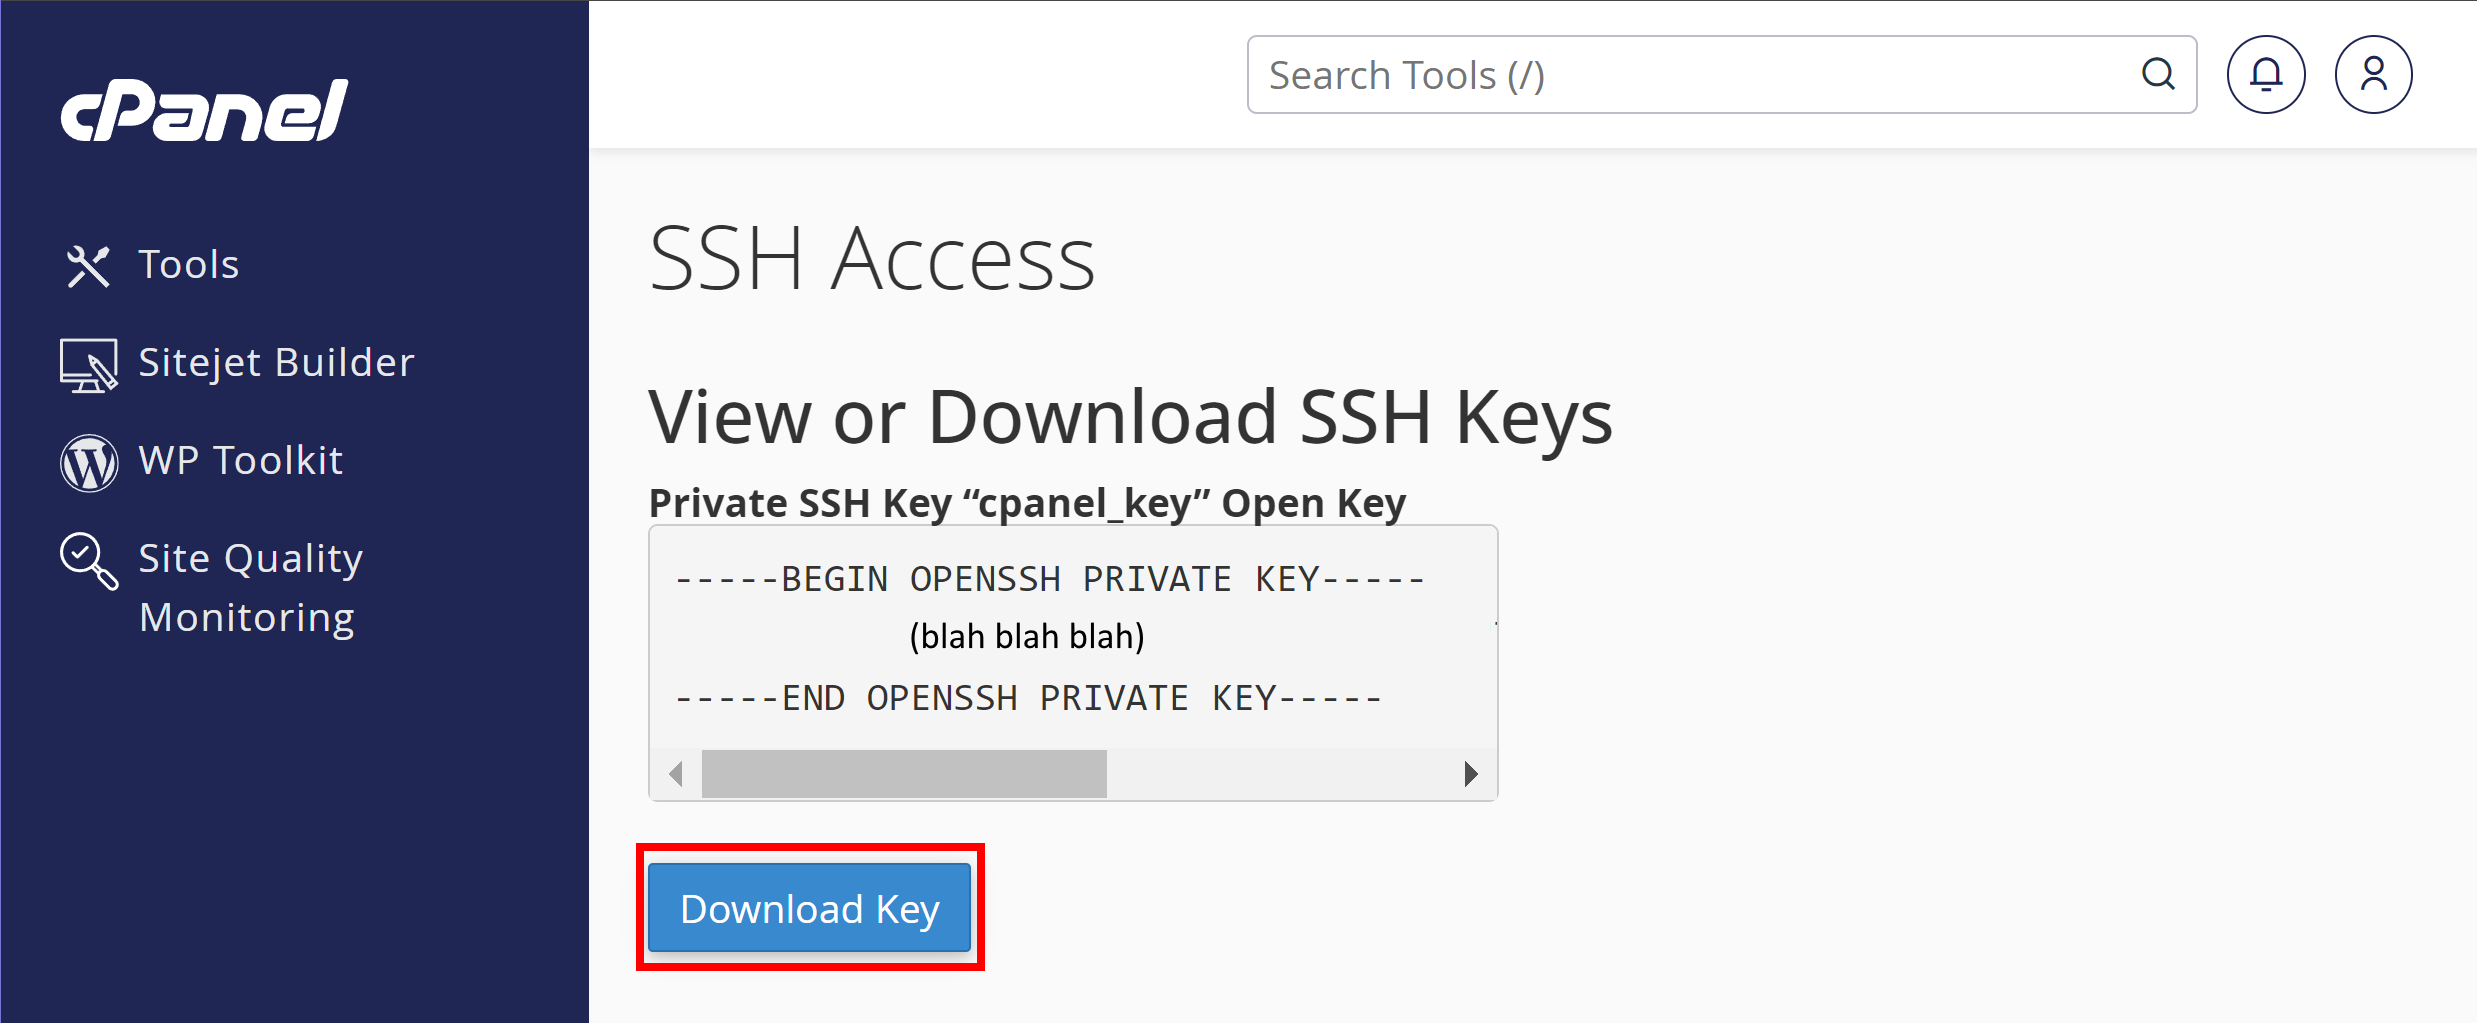
Click View/Download for the Private Key - Now you should see a big text box with all kinds of junk
inside it: do not share this junk with anyone, keep it private (that's
why I didn't display mine in the screen shot!). Click on the
Download Key button under the text box.
Click the Download Key button - Choose a location for your file if prompted to do so. If your browser put the file in your Downloads folder, you can find it there and move it to a different directory if you wish.
Now you have generated a key so you can communicate via FileZilla between your computer and the dev.fast server. Time to add the key information to FileZilla.
Open up FileZilla if it's not already running. You need to create a connection so that FileZilla will remember it and allow you to easily connect whenever you want.
- From the FileZilla Edit menu,
select Settings.
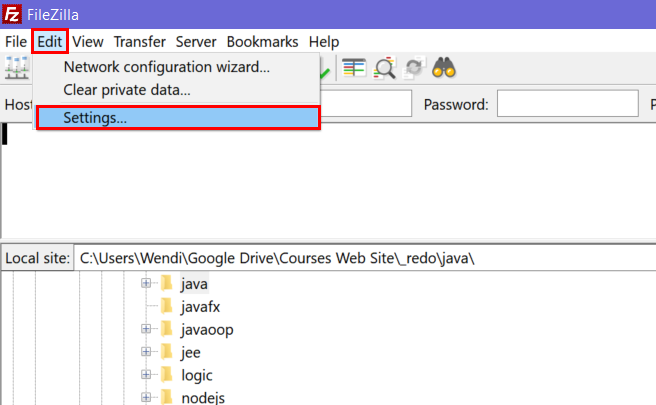
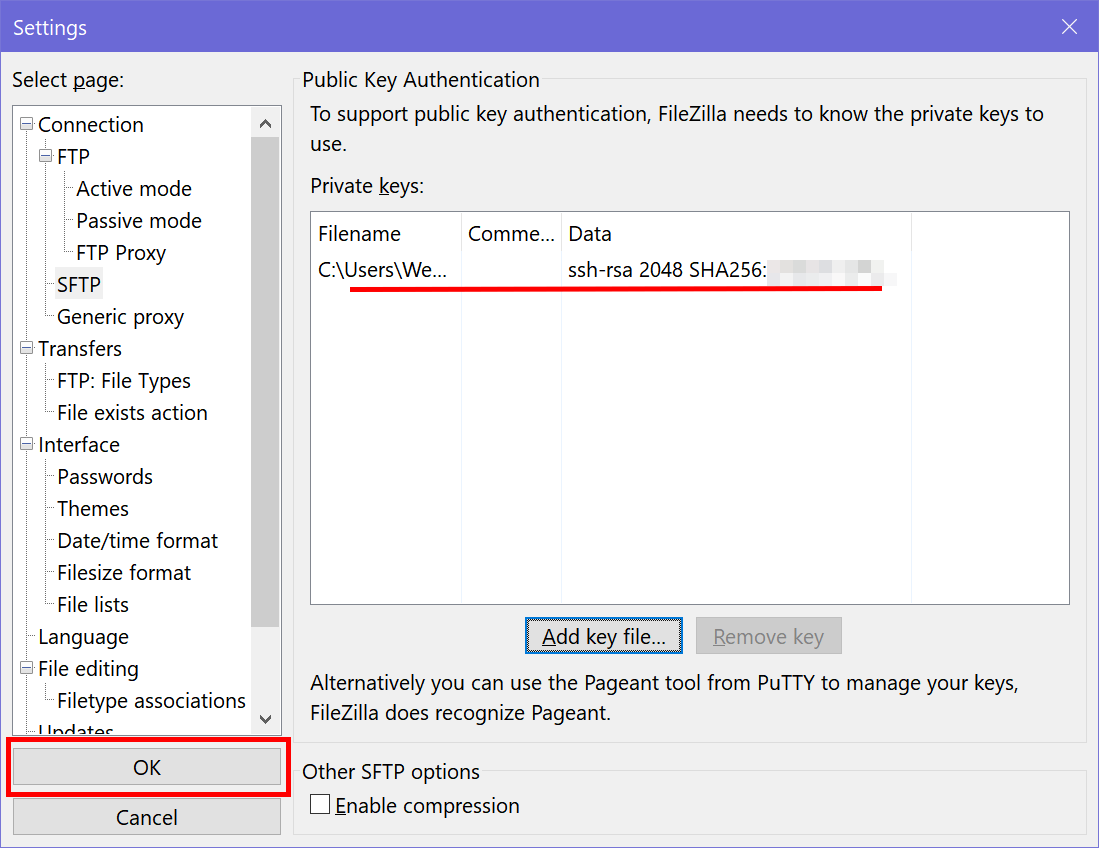
Filezilla: Select Edit > Settings - On the left side of the dialog, select SFTP in the "Connection" category.
- At the bottom-middle of the dialog, click the
Add key file... button.
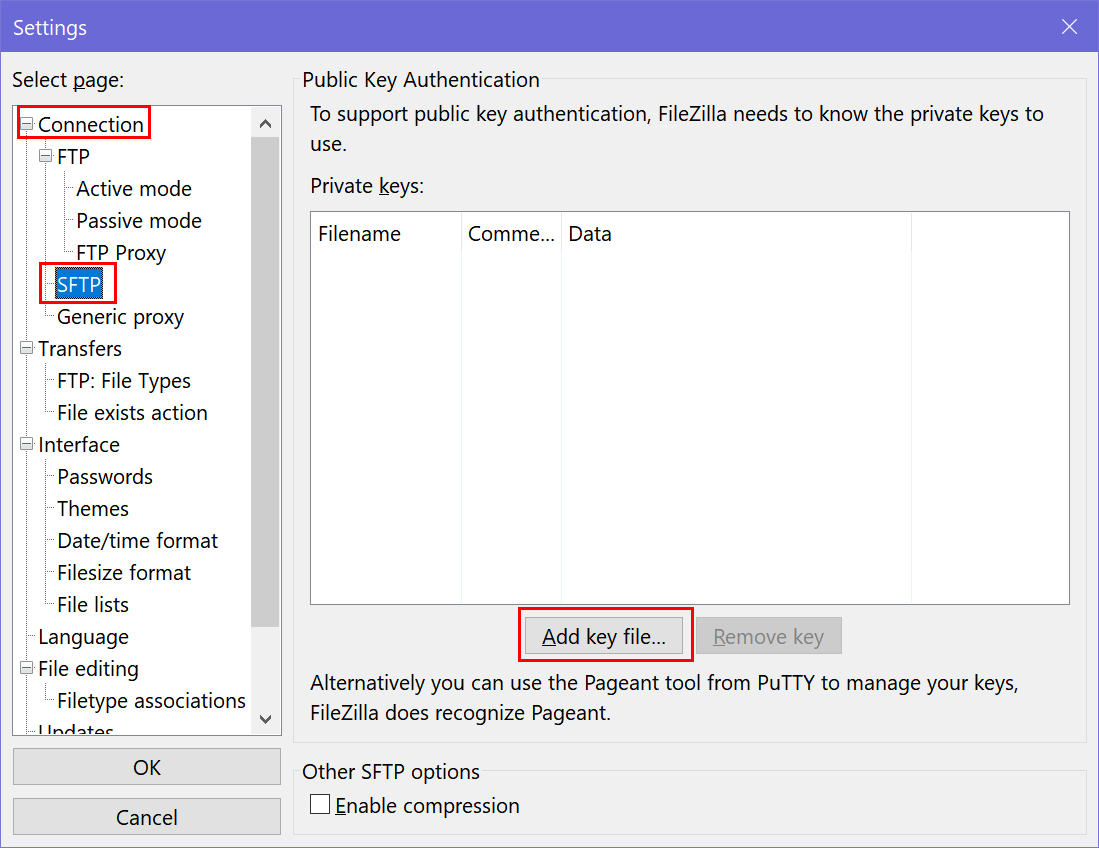
Click SFTP under "Connection" then click Add Key File - Now browse to where your cpanel key file was saved and select it.
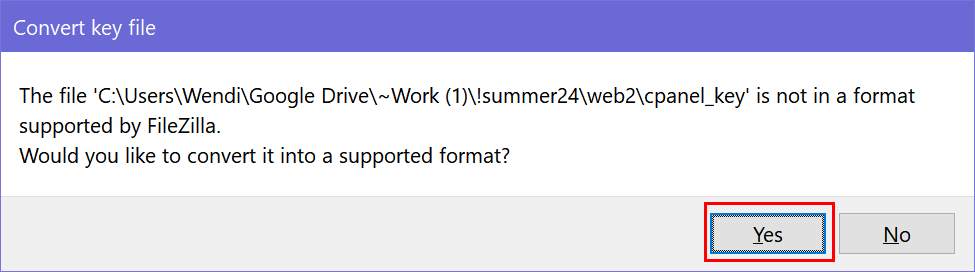
- After selecting your cpanel key file, a dialog box
will appear asking if you'd like to convert your key file
into a format that is supported by FileZilla.
Click Yes.
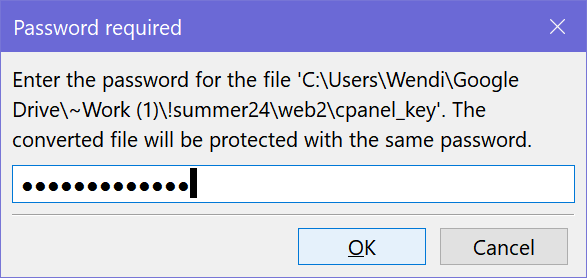
Click YES to convert your key file - When prompted, enter your key password, and
then click on the OK button.
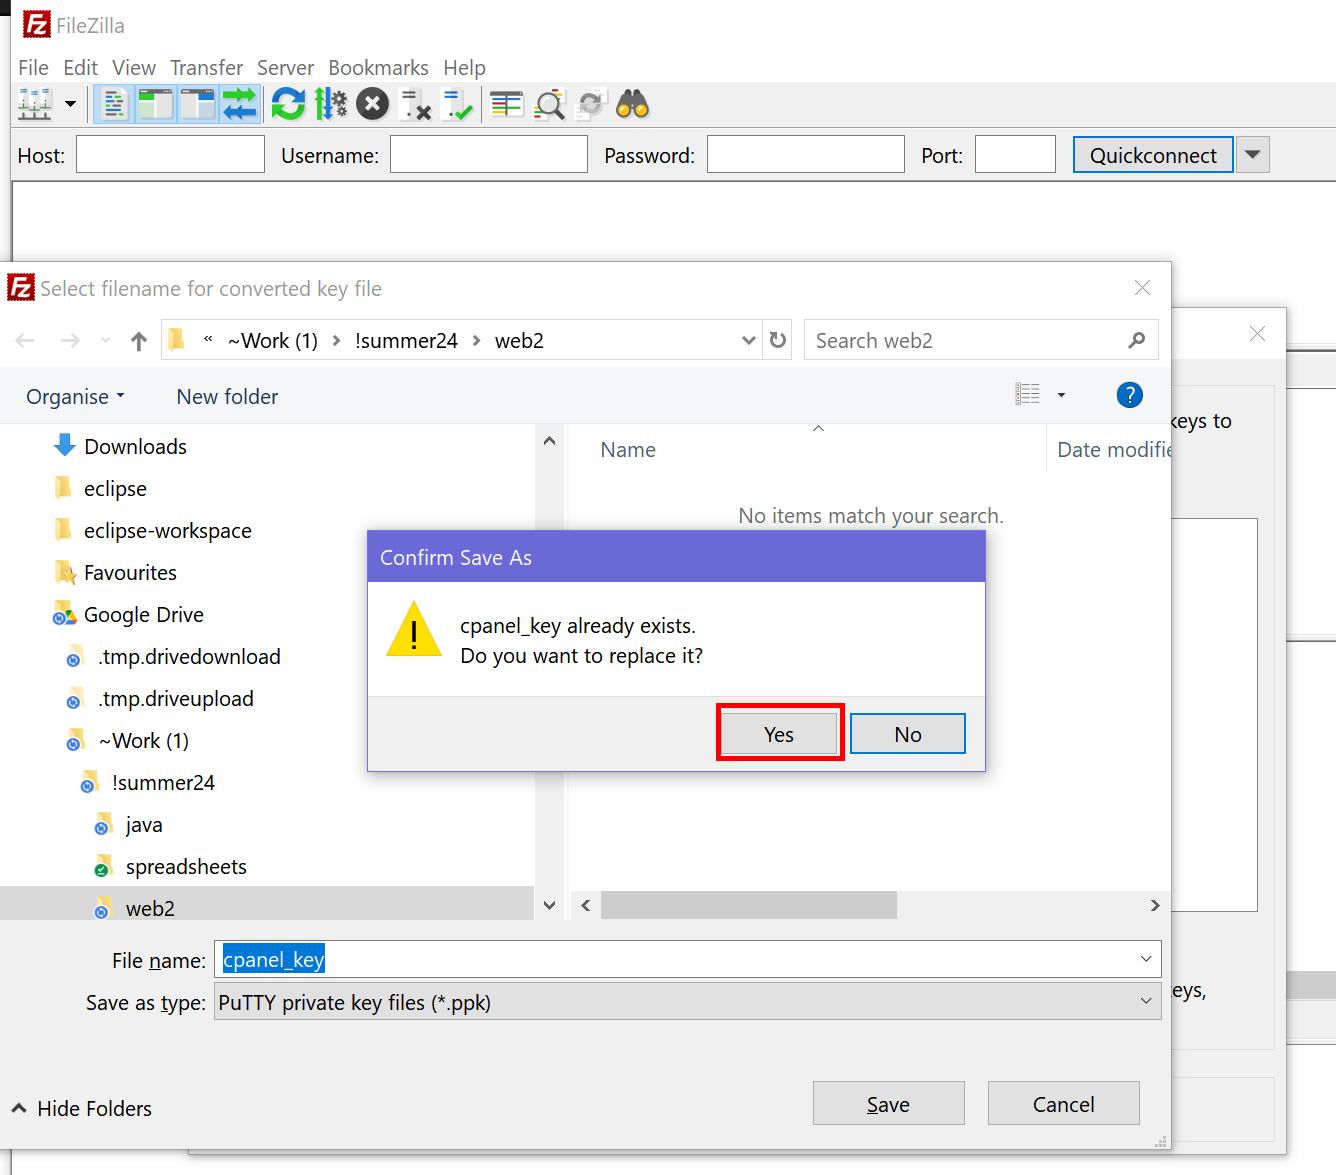
Enter your key password, then click OK - Now you are asked to choose a file name for the converted
key file. Just use the same name: it will overwrite the
original and that's ok. If it asks you to confirm overwriting
the original file, just say Yes. (It's not actually going to
overwrite it - if you take a look after you save, you'll
see the original cpanel_key and also cpanel_key.ppk).
Confirm overwriting the original key file - In the previous dialog, you'll now see your cpanel key file
in the list in the middle of the screen. Click OK to close the
dialog.
Click OK to exit the dialog
Now all that's left is to add or edit your connection to the dev.fast server. If you have this connection from last term, you just need to edit and test it, so you can skip over some of the steps below. If you have to create a new connection, follow all the steps.
- Open the Site Manager:
You can use File > Site Manager or Ctrl-S, or
click on the first button in the button bar,
shown in the screen shot below:
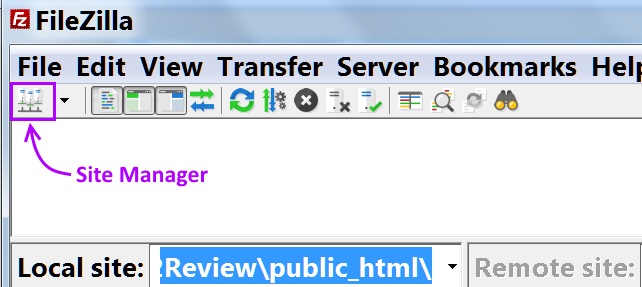
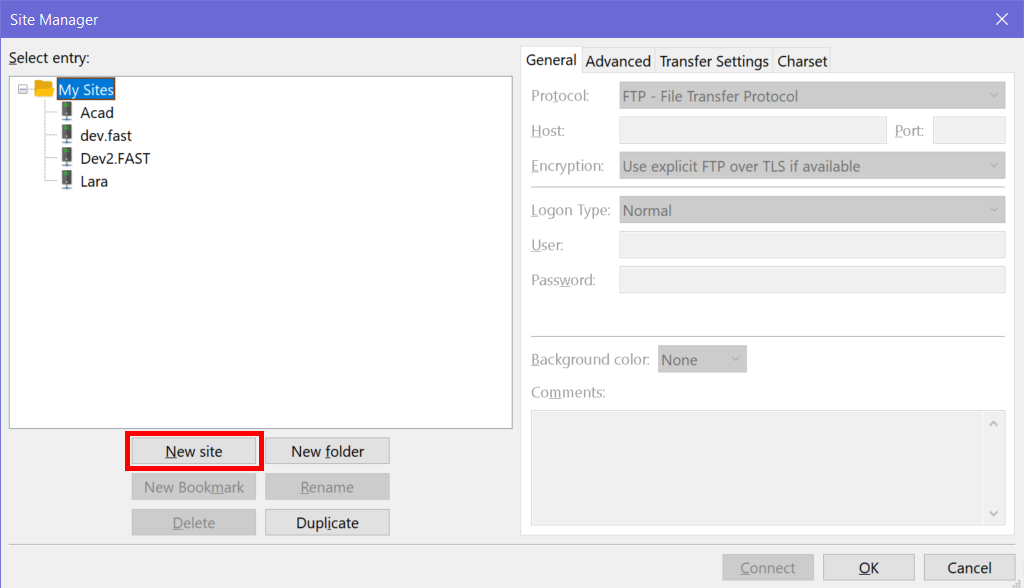
Open the Site Manager - Add a new connection: Click on the New Site
button below the list of sites (in my screen shot I have several
sites alreayd configured, but yours will likely be empty if
you've never done this before).
- If you are editing an existing connection to dev.fast, just select it in the site list instead, and the site configuration and details will appear on the right side of the window.
Add a New Site or click an existing one to edit it - You now need to enter the connection details. For the FAST
Development Server, use the following details (if a field is not listed here, leave
it set to its default value; if there is a field for the
name of the connection, just choose whatever you prefer):
- Protocol: SFTP - SSH File Transfer Protocol
- Host: dev.fast.sheridanc.on.ca
- User: enter your Sheridan login name (only the login name, not the UPN or email)
- Password: your Sheridan password (NOTE: if you're editing your settings from last term, you need to makes sure you change this to your Sheridan password, not the password you were given by the FAST Tech team.)
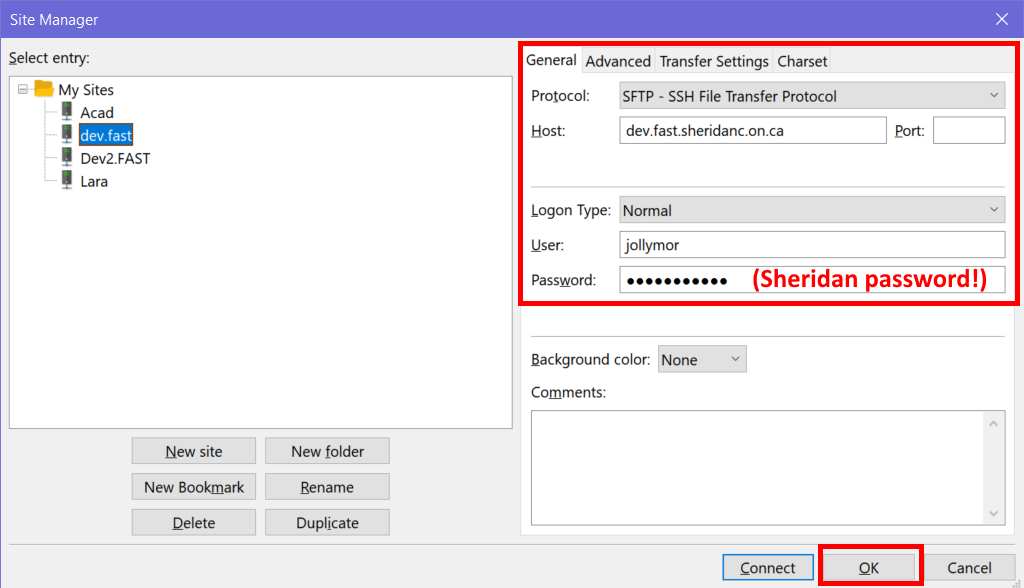
Fill in or edit the connection details - Save the connection by clicking the OK button.
You can connect to the dev.fast server any time by using the Site Manager (File > Site Manager or Ctrl-S) and clicking the Connect button for your connection. Or, you can use the small drop-down arrow beside the Site Manager button on the button bar, and select your connection from the list: it will connect automatically.
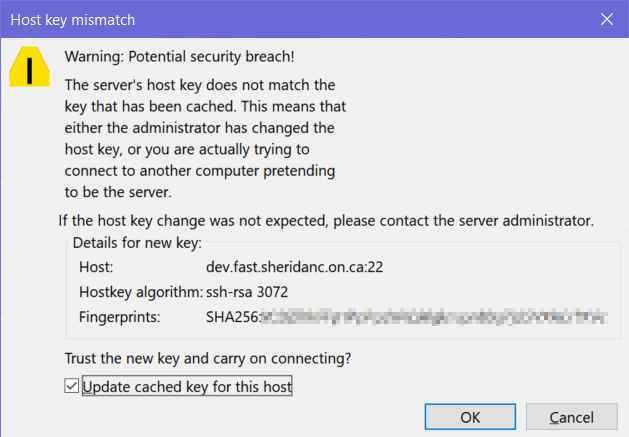
When you connect to the server using FileZilla, you will see the "Unknown Host Key" dialog box: Check the checkbox and click OK.
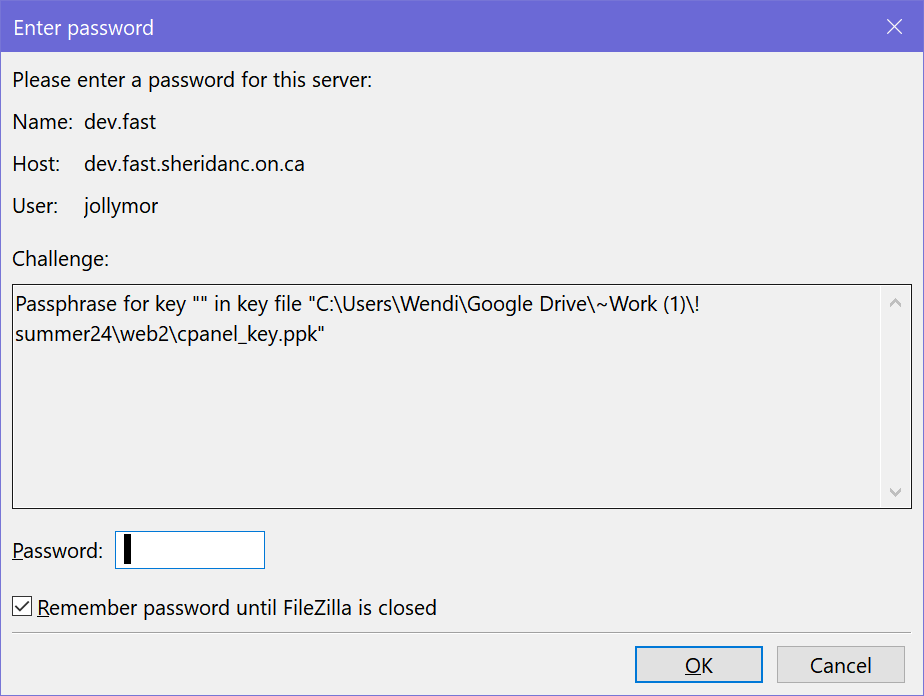
Next, you'll see the dialog that asks you for the key password. Enter the key password, and make sure the "Remember password until FileZilla is closed" checkbox is checked so you're not repeatedly prompted for it every time your connection times out. Then click OK.
If everything works, it should show you as connected and you can see the remote server directory listing. If you see any error messages, something didn't go right. Read the error message and fix the problems, then try again. Ask your professor if you see an error message that you don't understand.
Copying your Directories onto the Server
Your professor might require a slightly different directory structure (e.g. they might require you create a directory for your /syst10049 or /syst10199 course in the /public_html directory). Pay attention to the specific instructions given to you by your professor. If you're not sure, ask!!
Now you can mirror or clone your local workspace directory structure to the server in your /public_html directory. Open FileZilla if it's not already open.
- In FileZilla, connect to the development server if you're not already connected.
- Your local files are on the left side of the screen and your remote server is on the right side (think Left/Local, Right/Remote).
- On the server/remote side, make sure you are in your
public_htmldirectory by selecting in from inside your home directory: you can click it or you can click the small + sign beside it to expand the directory. When selected, the full path should appear above the main remote directory listing in the "Remote Site:" field.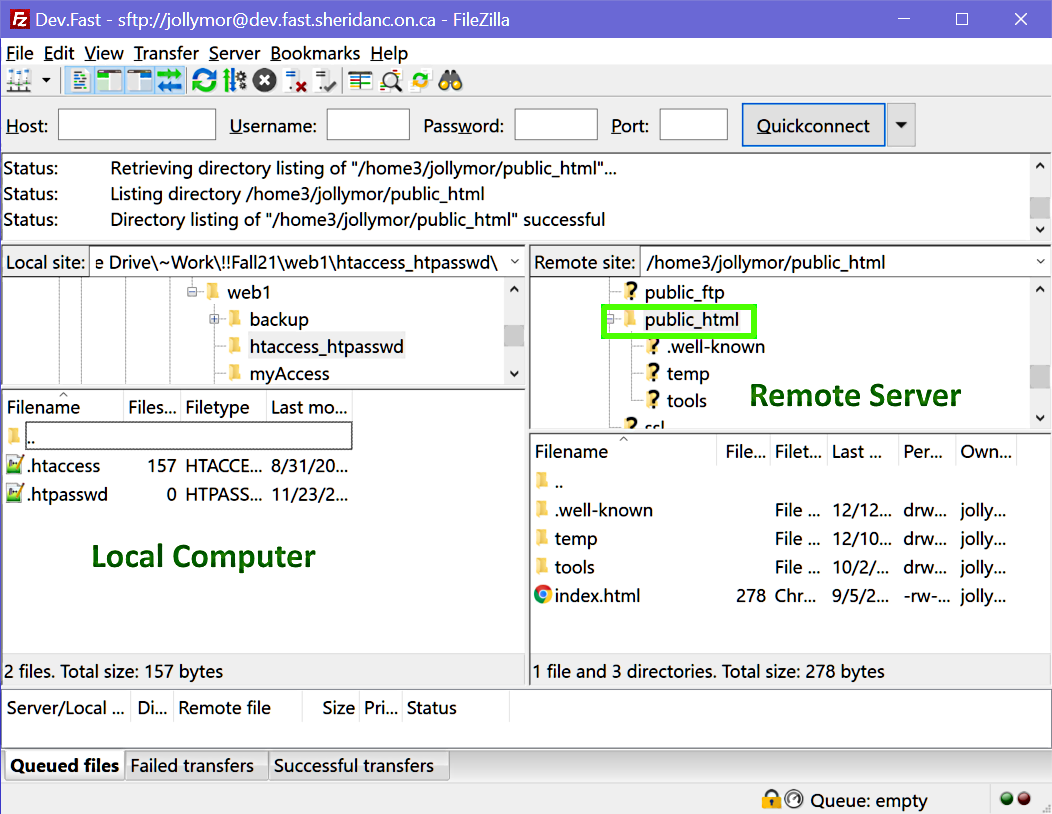
Make sure public_html is the current directory. - Now just drag all the directories (/assignments, /week3, /week4, etc)
over from the local side (left side) to the remote side:
- select all the directories on the local side by clicking the top directory, then hold down your computer's SHIFT key while you select the last directory - now all the directories should show as selected
- use your mouse to drag-and-drop the selected directories over from
the local (left) side to the remote (right) side
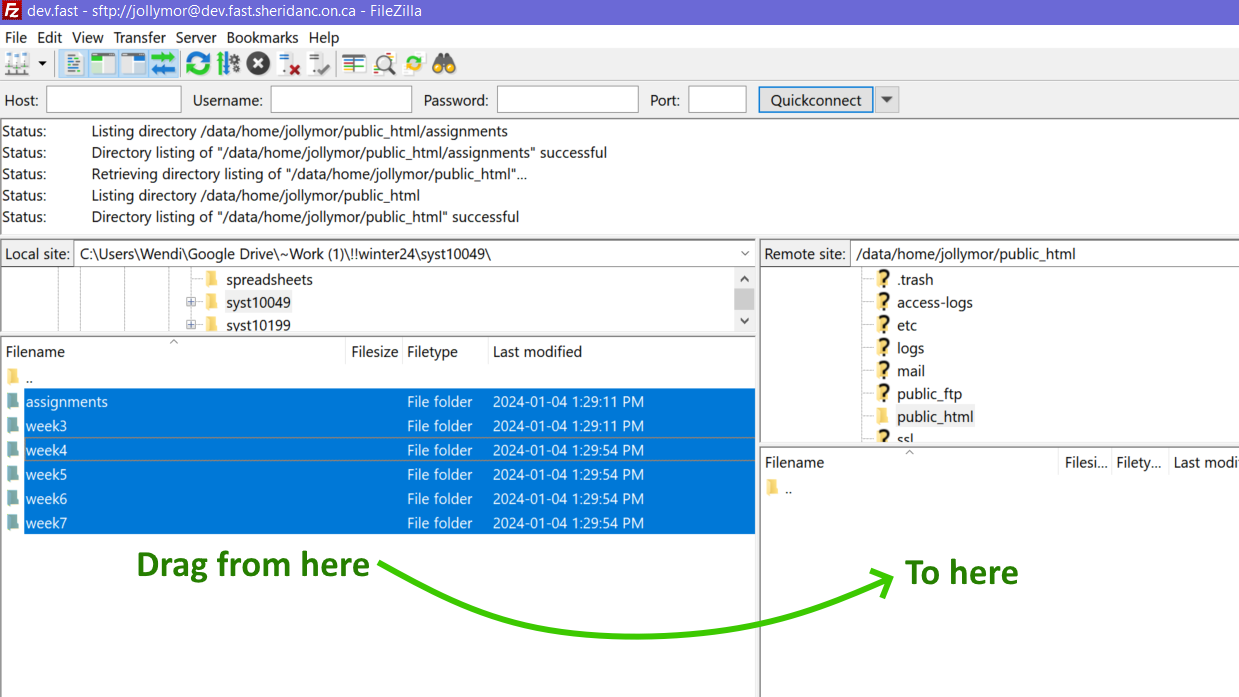
Drag the selected files from the local side to the remote side
- You should now have a copy of all the files/directories from
your local workspace onto your server space.
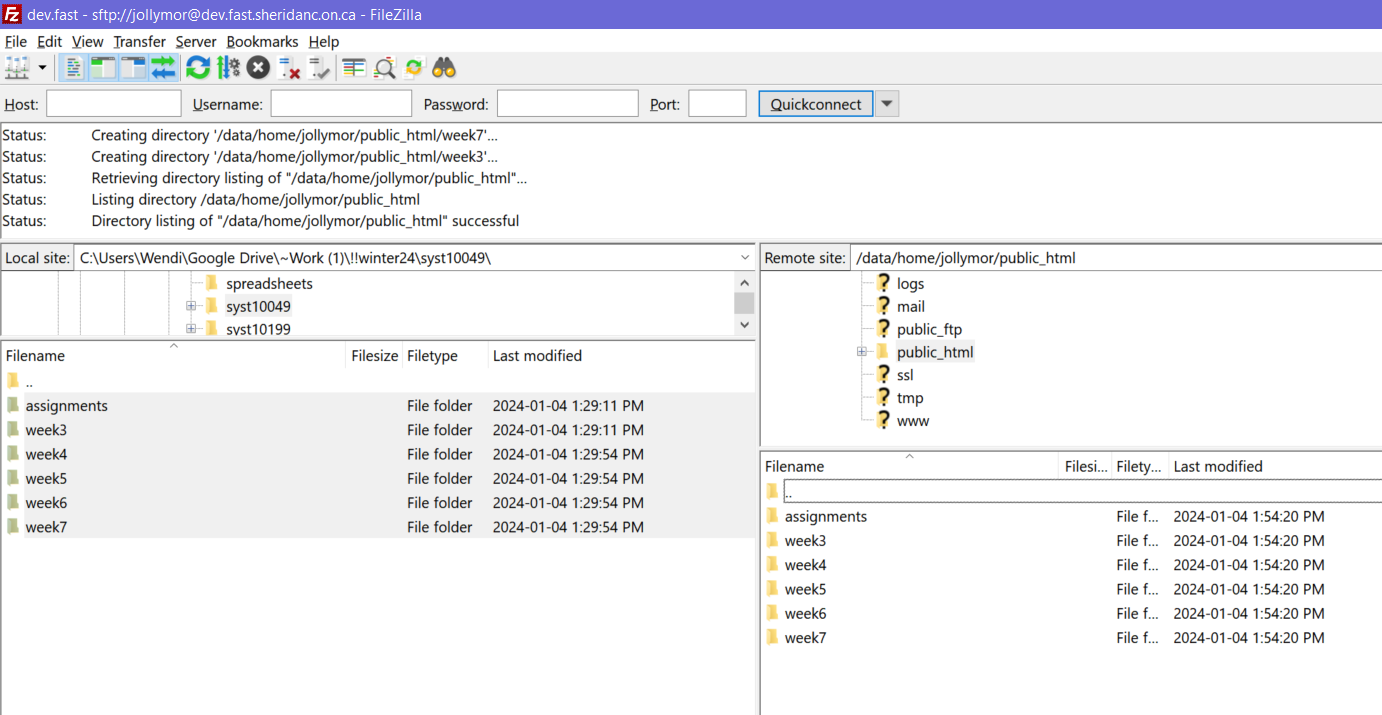
Now your directories/files have been uploaded to the server.
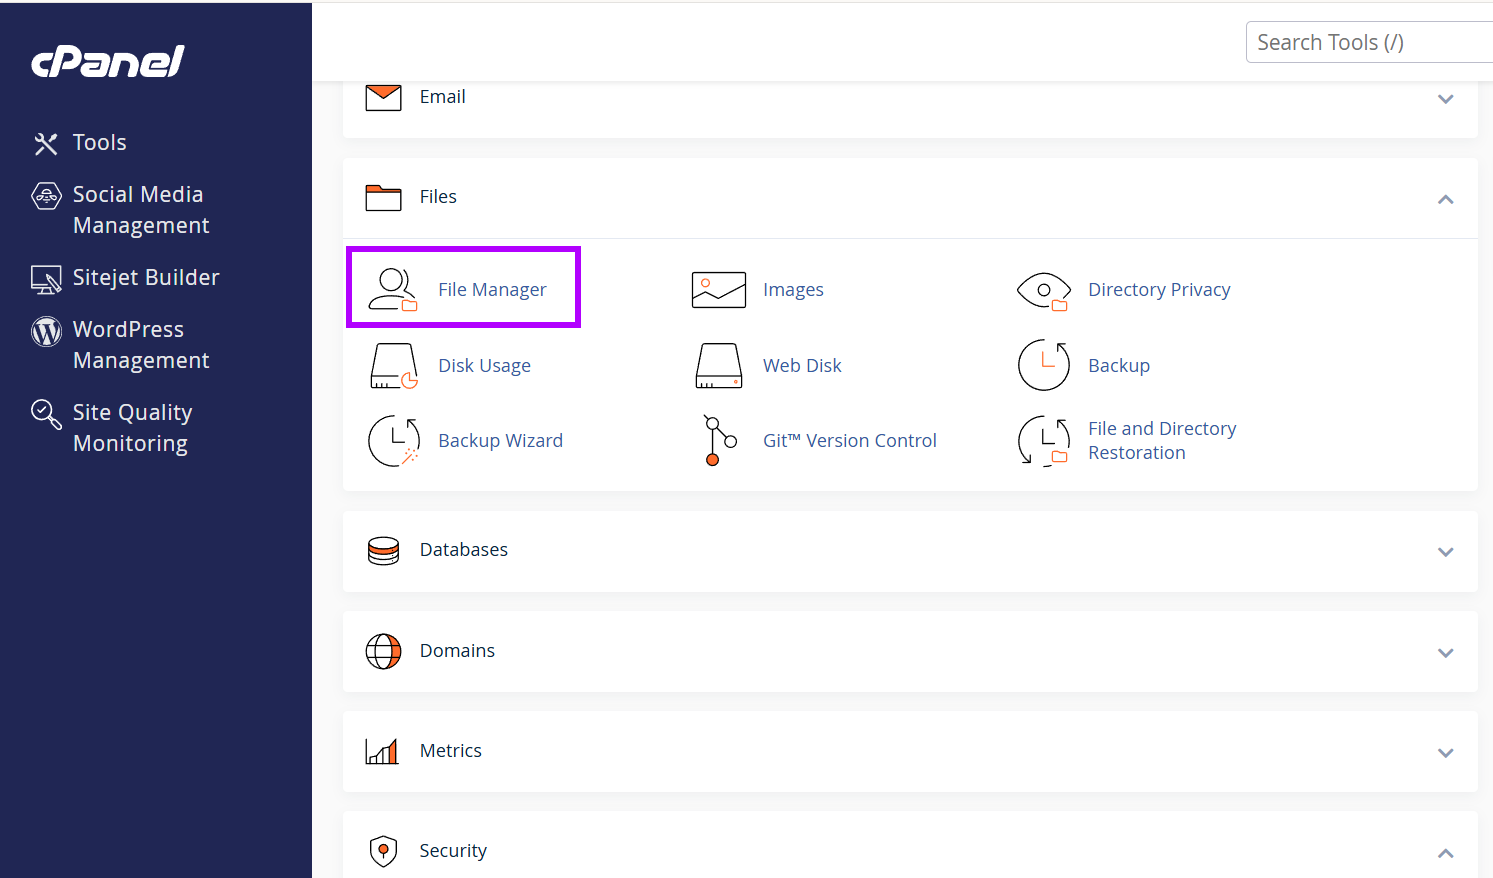
- Log into the dev.fast server and on the cPanel main menu,
go to the File category and click on
File Manager.
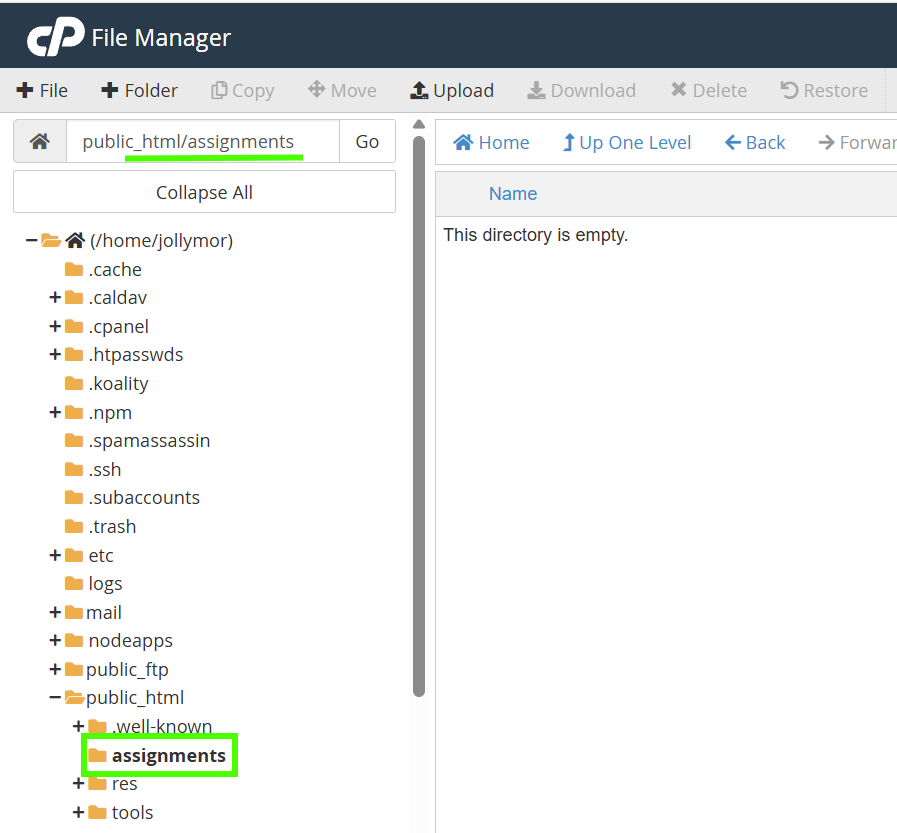
Make sure public_html is the current directory. - On the left side of the File Manager app,
make sure public_html
is the current directory (it will be bold - if not, click it).
You should also notice that it says "public_html" in the field at the
top of the list, between the house icon and the GO button.

Make sure public_html is the current directory. - If you still have projects/files from a previous semester, you can delete those, assuming you already have copies on your own computer (if not, you'll have to manually download all the files).
The /public_html directory is where you would create all your project directories and upload files. For example, you should first create your /assignments directory for your graded assignments (Note that file/directory names are case-sensitive, so your directory/file names must always match the instructions EXACTLY):
- Click the "+Folder" button above the list of directories on the left.
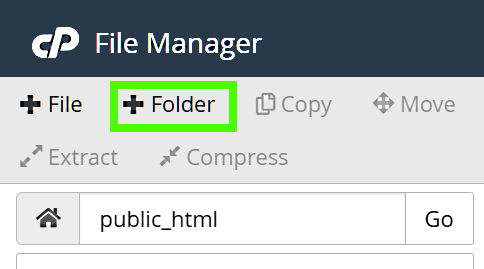
Add a new directory. - Enter the name of the "New Folder Name" as
the name of the directory you want to create.
If you are creating the /assignments directory, it needs
to be "assignments" in all lower-case. DO NOT type it any
other way or I will not be able to access
your assignments and you risk a grade penalty.

Enter the new directory name, e.g. assignments - Double-check that "New folder will be created in" is set to "public_html". If it isn't, you can just change the selection.
- Click the "Create new Folder" button.
To create sub-directories, simply click the parent directory in your directory list on the left so that you're inside that directory (again, it should be bold and also show in the field at the top of the directory list). Then click the "+Folder" button to repeat the process above.
To upload files, click the directory where you want to upload and select the "Upload" button.
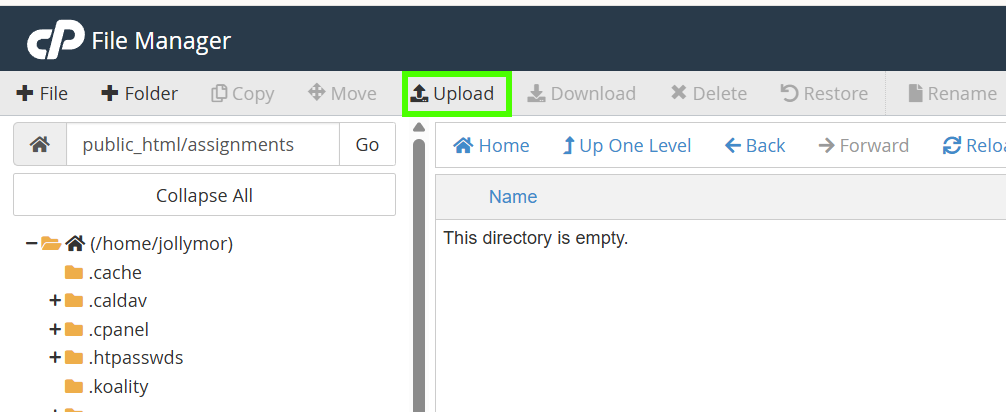
A new browser tab/window will open. You can use the "Select File" button to browse and select files on your system or you can simply drag files from another window (e.g. Windows File Manager) to the area on the screen.
If you are copying over files that already exist, make sure you check the Overwrite existing files checkbox.
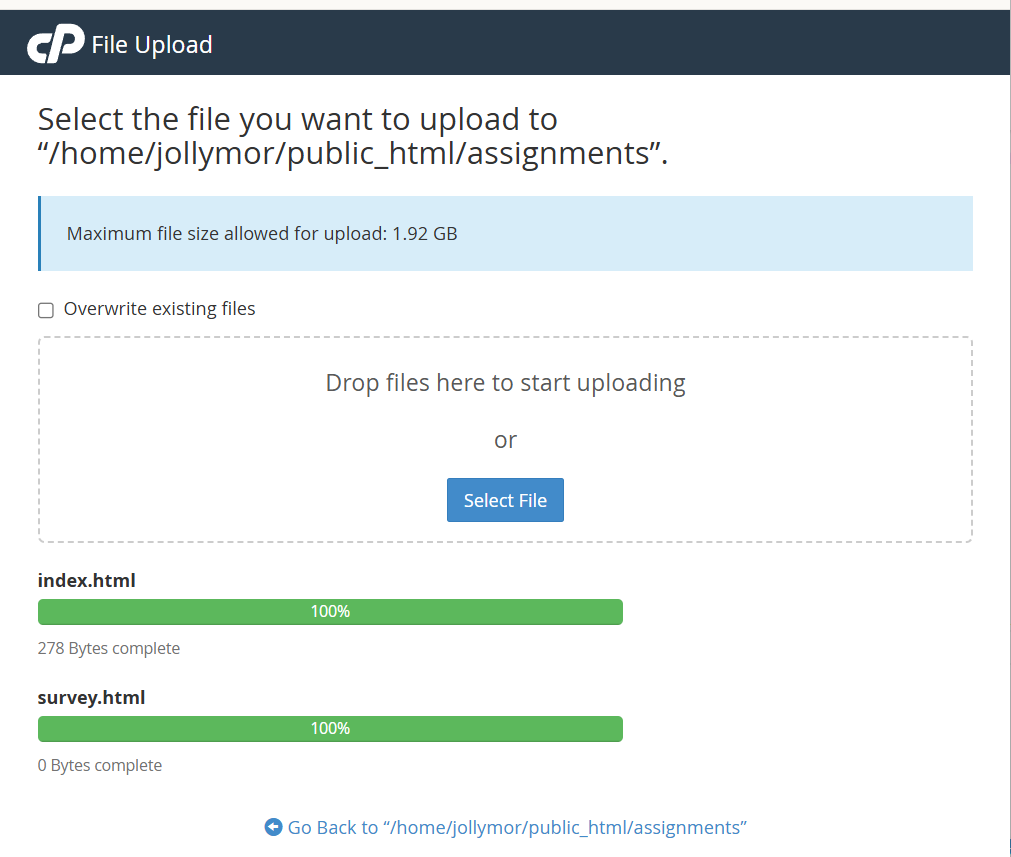
When the upload is complete, you can use the "Go Back..." link at the bottom of the screen to return to the file manger. You should see your uploaded files listed.
You can't upload a whole directory at once by selecting or dragging the directory in the Select Files screen! :(
You have to first create the directory on the server, then enter it, and then upload the files that belong in that directory. Yes, it's tedious, that's one reason why using an FTP client is preferred.
You can repeat this process for any directory/directories or file(s) that you want to upload from your local machine to the server. For more information on publishing, see How to Publish. You will create other directories throughout the course, so make sure you keep these instructions handy (i.e. bookmark them or summarize them in your notes) so you can refer to them if you need to.
Password Protect Assignments
You should now password-protect your assignments directory. The instructions are on a separate page:
Protect Using the cPanel Directory Privacy Tool (opens in a new tab/window)
After you have set up your /assignment directory's credentials, come back to this page.
Sharing your /assignments credentials with anyone other than your professor will constitute a breach of academic integrity and will be dealt with accordingly.
If you are still not sure or the professor has not provided a link to one of those documents in the course materials, email your professor and ask for clarification.
Once you have set up credentials for your /assignments directory, you can test it out:
- Open an "Incognito" or "private" window in your browser.
- In your browser's address bar, navigate to https://login.dev.fast.sheridanc.on.ca/ (replace "login" with your Sheridan user name). Make sure everything is in lower-case.
- You should see a page that is similar to the one below.
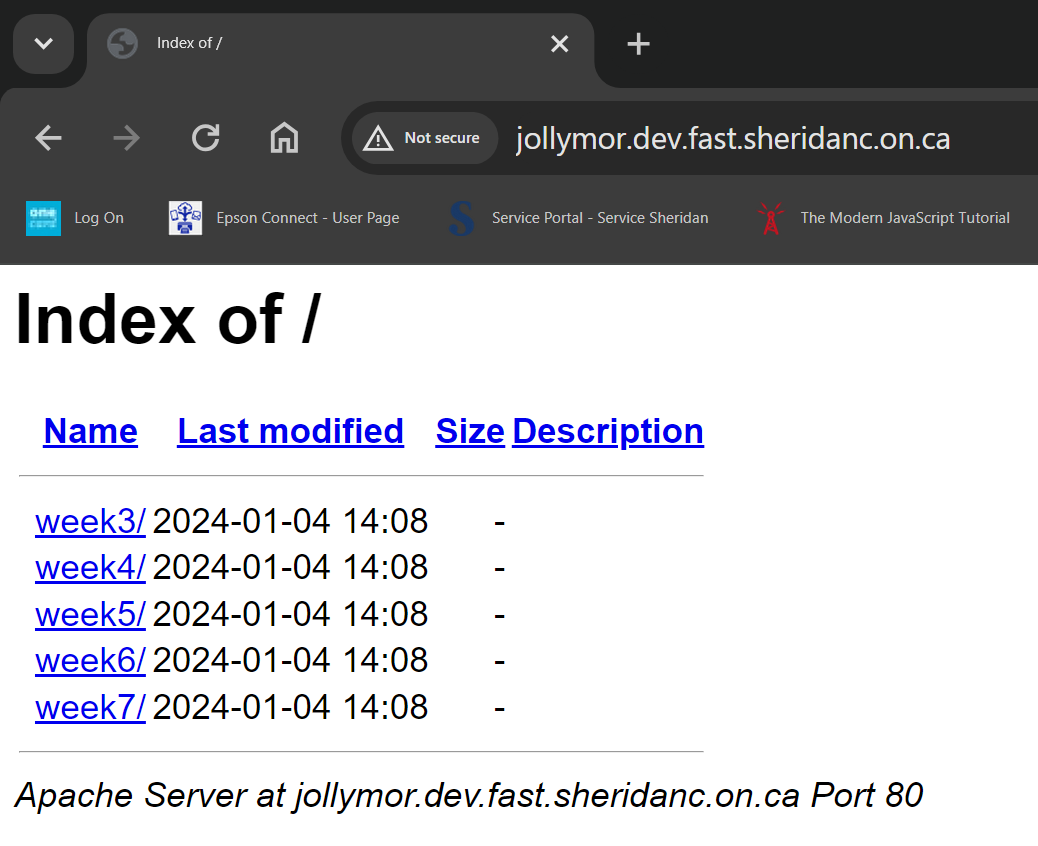
your /assignments directory should not appear
Notice that you don't see your /assignments directory. That's normal: that is what is supposed to happen! Your /assignments directory is protected - no one can see it unless they are logged in using the credentials you just created. The only way for someone to access it is if they know to type /assignments at the end of the URL and they know your login and password. - Now go up into the browser's address bar and add
/assignmentsto the end of the URL.

Navigate to the /assignments sub-directory - You should now be prompted to log in. Use your Sheridan username
and the password you created for your /assignments directory.
Remember, this is not your Sheridan password or cPanel
password, this is the password you just created for your
/assignments directory.
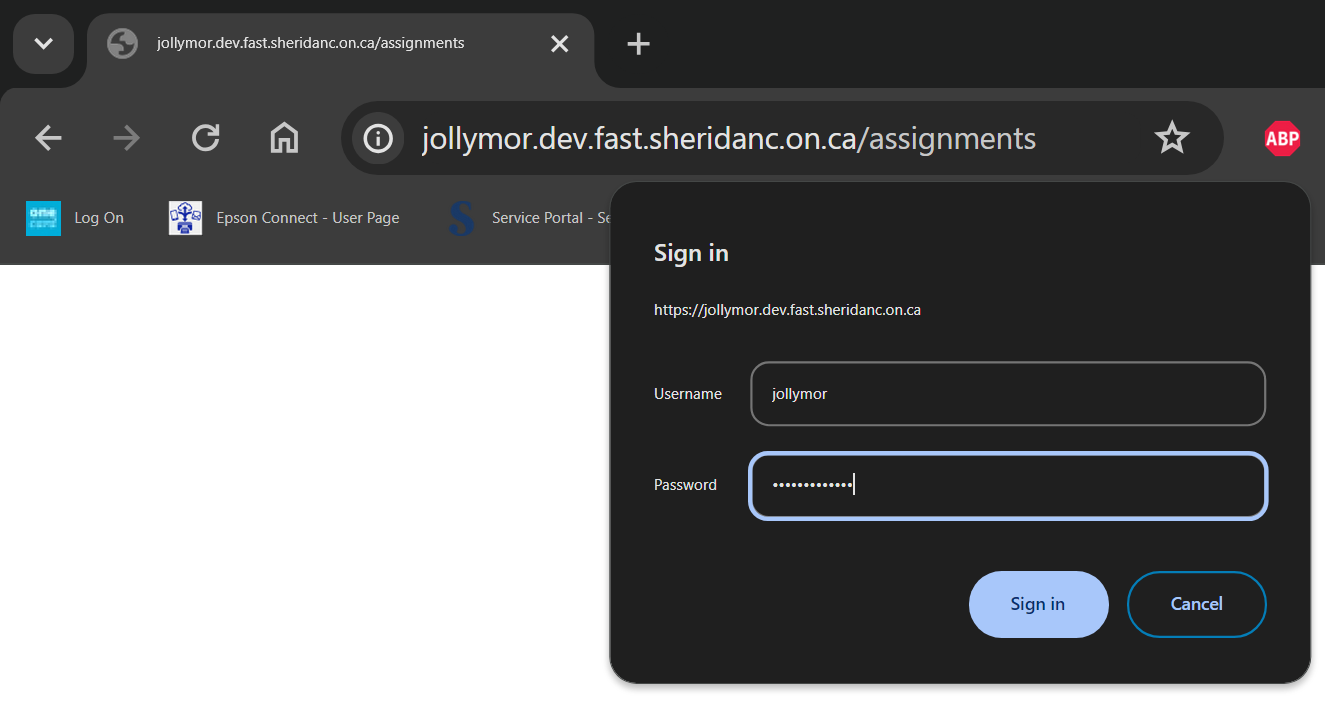
Log in with the credentials you just created for your /assignments directory. - After you successfully log in, you should be in the /assignments
directory and see the contents of that directory (it's very likely
empty, unless you've already added sub-directories/files in there
previously).
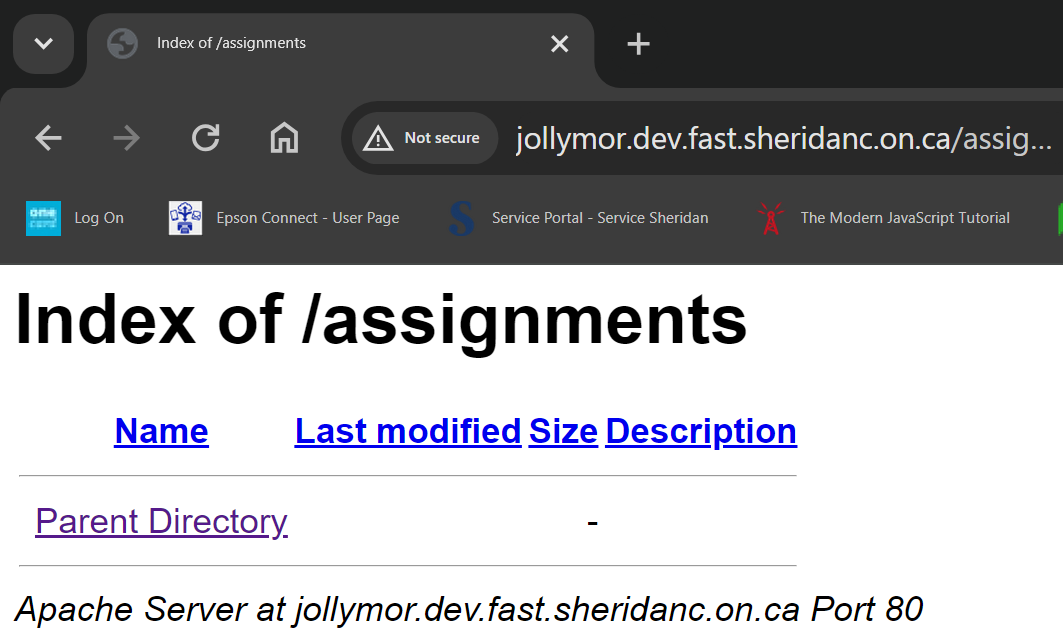
viewing your /assignments directory after logging in
If you have any issues with this process, review the instructions and make sure you followed them exactly as they are written. If you still can't figure out the problem, ask your professor for assistance: be sure to provide thorough details of what is going wrong, and take screen shots of any error messages or strange output you have.